# 一、开始
前面文章讲了@babel/core (opens new window)、@babel/parser (opens new window)的原理,这次讲一下@babel/traverse。
这个库主要是遍历AST,操作Node上的节点。
# 二、API说明
@babel/traverse暴露了traverse(ast, opts)这个API:
import * as parser from "@babel/parser";
import traverse from "@babel/traverse";

const code = `function square(n) {
  return n * n;
}`;

const ast = parser.parse(code);

traverse(ast, {
  enter(path) {
    if (path.isIdentifier({ name: "n" })) {
      path.node.name = "x";
    }
  },
});

// 或者
traverse(ast, {
  FunctionDeclaration: function(path) {
    path.node.id.name = "x";
  },
});
opts为一个对象,其key可以是enter/exit,也可以是FunctionDeclaration这种Node.type,或者FunctionDeclaration|Identifier这种组合模式。
如果opts的key为enter/exit,在进入每一个节点的时候都会调用此函数,如果key为Node.type,则只有在解析到对应的节点时才调用此函数。
# 三、源码解析
本次分析的@babel/traverse版本是v7.16.3 (opens new window)。
# 1. 目录结构
@babel/traverse的目录结构如下:
- path // 暴露出来的path对象,会作为插件的第一个参数
  - ancestry.ts
  - context.ts
  - removal.ts
  - replacement.ts
  - index.ts
  ...
- scope // 作用域相关
  - binding.ts
  - index.ts
- cache.ts
- hub.ts
- context.ts // 导出TraversalContext,包含visit方法,其会调用path中的visit,也就是执行插件
- types.ts // ts类型
- visitors.js // 格式化visitor
- index.ts // 暴露traverse方法
# 2. 运行机制
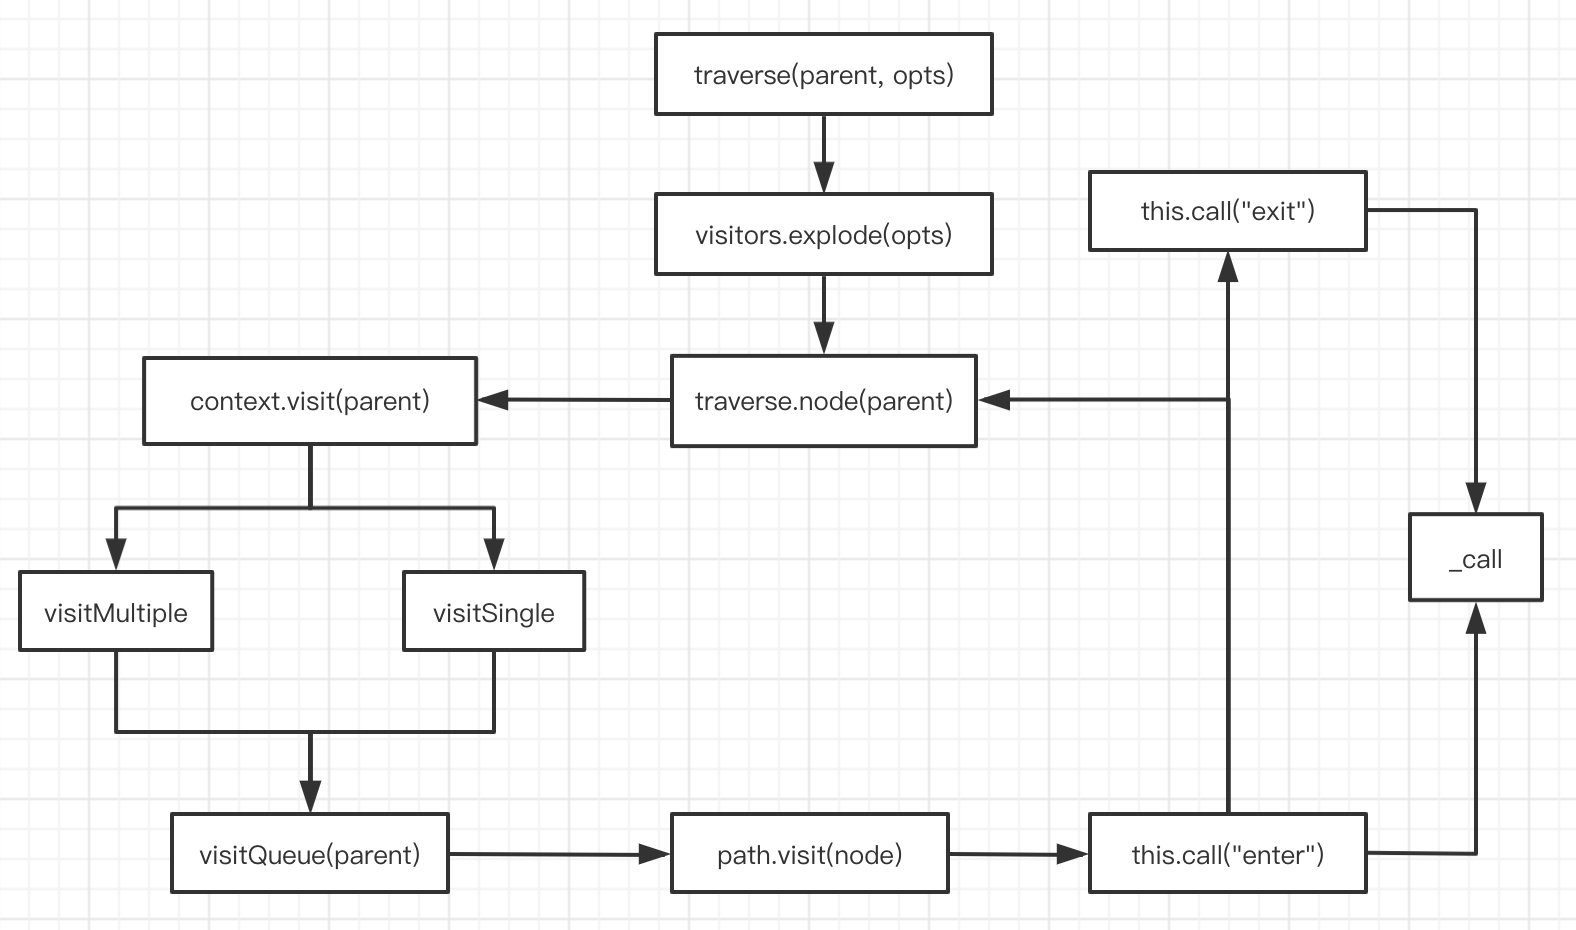
traverse方法会先判断传入的节点类型是否在VISITOR_KEYS中,是的话,执行visitors.explode(opts),然后调用traverse.node。
function traverse(
  parent: t.Node,
  opts: TraverseOptions = {},
  scope?: Scope,
  state?: any,
  parentPath?: NodePath,
) {
  if (!parent) return;

  if (!VISITOR_KEYS[parent.type]) {
    return;
  }

  visitors.explode(opts);

  traverse.node(parent, opts, scope, state, parentPath);
}
VISITOR_KEYS是从@babel/types导出的,在definitions/core.ts (opens new window)可以看到。
它是一个对象,key为node.type,value是node属性的数组:
{
  ArrayExpression: [ 'elements' ],
  AssignmentExpression: [ 'left', 'right' ],
 ClassDeclaration: [
    'id',
    'body',
    'superClass',
    'mixins',
    'typeParameters',
    'superTypeParameters',
    'implements',
    'decorators'
  ],
  // ...
}
visitors.explode方法会格式化传过来的第二个参数:
- 传入一个方法的话,将其转为包含
enter的对象,如Identifier() { ... }->Identifier: { enter() { ... } } - 分离
node.type,如"Identifier|NumericLiteral": { ... }->Identifier: { ... }, NumericLiteral: { ... } - 将
enter/exit转为数组,如enter() {}->[enter() { }] - 传入的
node.type是@babel/types中的别名的话,对其做扩展,如Property: { ... }->ObjectProperty: { ... }, ClassProperty: { ... }
看下traverse.node:
traverse.node = function (
  node: t.Node,
  opts: TraverseOptions,
  scope?: Scope,
  state?: any,
  parentPath?: NodePath,
  skipKeys?,
) {
  const keys = VISITOR_KEYS[node.type];
  if (!keys) return;

  const context = new TraversalContext(scope, opts, state, parentPath);
  for (const key of keys) {
    if (skipKeys && skipKeys[key]) continue;
    if (context.visit(node, key)) return;
  }
};
traverse.node中新建了一个TraversalContext对象,然后调用了context.visit(node, key)。
一般情况下,初始传入的node.type是File,而VISITOR_KEYS['File']为['program']。
看下context.visit:
visit(node, key) {
  const nodes = node[key];
  if (!nodes) return false;

  if (Array.isArray(nodes)) {
    return this.visitMultiple(nodes, node, key);
  } else {
    return this.visitSingle(node, key);
  }
}
context.visit方法先判断node[key]类型,如果是数组类型,调用visitMultiple,否则调用visitSingle。
visitMultiple和visitSingle最后都会调用visitQueue,只不过因为前者是数组类型,所以会依次遍历每个元素执行visitQueue方法。
visitMultiple(container, parent, listKey) {
  // nothing to traverse!
  if (container.length === 0) return false;

  const queue = [];

  // build up initial queue
  for (let key = 0; key < container.length; key++) {
    const node = container[key];
    if (node && this.shouldVisit(node)) {
      queue.push(this.create(parent, container, key, listKey));
    }
  }

  return this.visitQueue(queue);
}

visitSingle(node, key): boolean {
  if (this.shouldVisit(node[key])) {
    return this.visitQueue([this.create(node, node, key)]);
  } else {
    return false;
  }
}
visitQueue主要是调用了path.visit方法:
visitQueue(queue: Array<NodePath>) {
  this.queue = queue;
  this.priorityQueue = [];

  const visited = new WeakSet();
  let stop = false;

  for (const path of queue) {
    path.resync();

    if (
      path.contexts.length === 0 ||
      path.contexts[path.contexts.length - 1] !== this
    ) {
      path.pushContext(this);
    }

    if (path.key === null) continue;

    const { node } = path;
    if (visited.has(node)) continue;
    if (node) visited.add(node);

    if (path.visit()) {
      stop = true;
      break;
    }
  }
context.visit方法核心逻辑主要是this.call('enter')、traverse.node、this.call('exit')。这里的traverse.node实现了递归。
export function visit(this: NodePath): boolean {
  if (!this.node) {
    return false;
  }

  if (this.isDenylisted()) {
    return false;
  }

  if (this.opts.shouldSkip && this.opts.shouldSkip(this)) {
    return false;
  }

  const currentContext = this.context;
  if (this.shouldSkip || this.call("enter")) {
    this.debug("Skip...");
    return this.shouldStop;
  }
  restoreContext(this, currentContext);

  this.debug("Recursing into...");
  traverse.node(
    this.node,
    this.opts,
    this.scope,
    this.state,
    this,
    this.skipKeys,
  );

  restoreContext(this, currentContext);

  this.call("exit");

  return this.shouldStop;
}
call方法会调用_call,先执行_call(opts[key]),然后执行_call(opts[this.node.type][key])call('enter')。
如果插件格式是enter() {},则会执行它,如果插件格式是NODE_TYPE(){},则只在访问到相应的node时会执行。
_call方法中主要通过fn.call方法真正的执行插件。
export function call(this: NodePath, key: string): boolean {
  const opts = this.opts;

  this.debug(key);

  if (this.node) {
    if (this._call(opts[key])) return true;
  }

  if (this.node) {
    return this._call(opts[this.node.type] && opts[this.node.type][key]);
  }

  return false;
}

export function _call(this: NodePath, fns?: Array<Function>): boolean {
  if (!fns) return false;

  for (const fn of fns) {
    if (!fn) continue;

    const node = this.node;
    if (!node) return true;

    const ret = fn.call(this.state, this, this.state);

    // node has been replaced, it will have been requeued
    if (this.node !== node) return true;

    // this.shouldSkip || this.shouldStop || this.removed
    if (this._traverseFlags > 0) return true;
  }

  return false;
}
# 3. 流程图
