babel-parser 源码解析
一、开始
上篇文章介绍了@babel/core,这次分析下@babel/parser。
@babel/parser主要可分为词法分析和语法分析两大部分,我们来看下二者都是如何运作、如何结合的。
二、API说明
babel之前的版本是直接调用了recast库,来生成的AST。现在的@babel/parser很大程度借鉴了acorn。
看源码之前可以先看文档,对它的功能、API有基本认识。
@babel/parser对外主要暴露了parse和parseExpression两个API,形式为:
| babelParser.parse(code, [options])
|
看下options中的sourceType参数,其值可以是script、module、unambiguous,默认是script。
如果是unambiguous的话会根据代码中是否出现import/export关键词来判断sourceType,如果出现了import/export则将sourceType更新为module,否则为script。
三、源码分析
本次分析的@babel/parser的版本是v7.16.4。
1. 目录结构
先看下它的目录结构:
| - parser
- base
- comment
- error
- expression
- index
- lval
- node
- statement
- plugins
- flow
- jsx
- typescript
- tokenizer
- context
- index
- state
- utils
- identifier
- location
- scope
- index
|
可以看出它主要包含3个部分:tokenizer、plugins、parser。其中
1. tokenizer用来解析获取Token,包括state和context;
2. parser包含node、statement、expression等;
3. plugins则是用来帮助解析ts、jsx等语法的。
从index.js看起,当调用parser.parse方法后,会实例化一个Parser,就是上面parser/index.js文件中的Parser。Parser的实现很有意思,它有一长串的继承链:
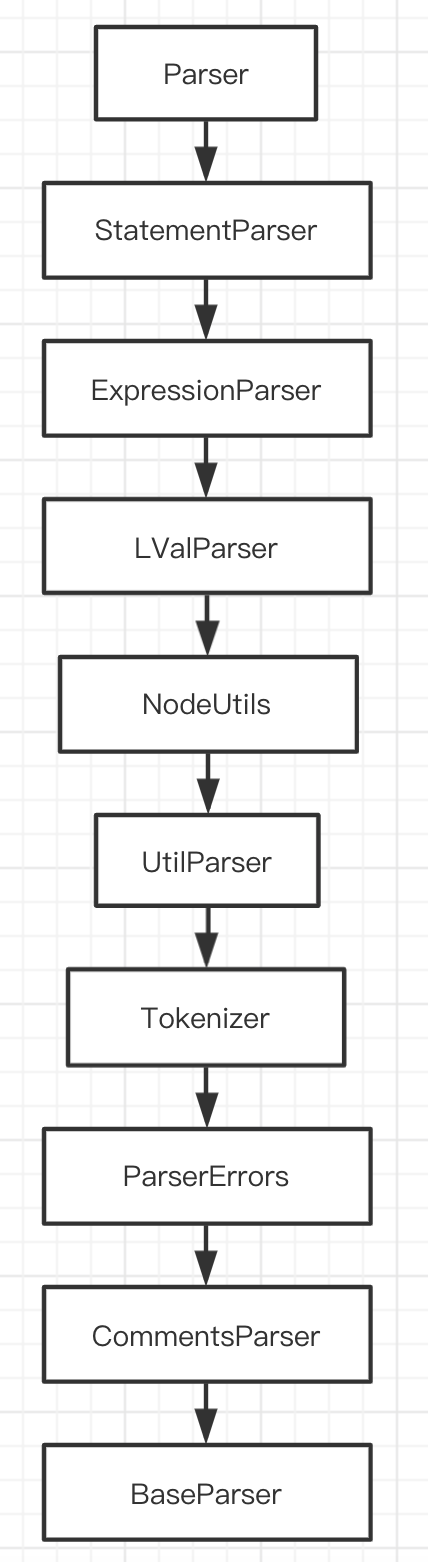
为什么要用这种方式组织代码呢?这种继承链的好处是只需要调用this就可以获取到其他对象的方法, 而且可以维护一份共同的数据,或者说状态,比如Node节点、state状态、context上下文、scope作用域等。
2. 运行机制
下面以一个极简单的例子来说明parser的运行机制:
| const { parse } = require('@babel/parser')
parse('const a = 1', {})
|
调用@babel/parser的parse方法的时候,会先通过getParser实例化一个Parser,然后调用Parser上面的parse方法。
| function getParser(options: ?Options, input: string): Parser {
let cls = Parser;
if (options?.plugins) {
validatePlugins(options.plugins);
cls = getParserClass(options.plugins);
}
return new cls(options, input);
}
|
由于Parser的继承关系,在实例化的时候会在各个类中进行一系列初始化操作,包括state、scope和context等。
然后进入parse方法,主要逻辑包括:
- 进入初始化的作用域
- 通过
startNode创建File节点和Program节点
- 通过
nextToken去获取一个token
- 通过
parseTopLevel递归去解析。
| export default class Parser extends StatementParser {
parse(): File {
this.enterInitialScopes();
const file = this.startNode();
const program = this.startNode();
this.nextToken();
file.errors = null;
this.parseTopLevel(file, program);
file.errors = this.state.errors;
return file;
}
}
|
startNode在NodeUtil这个类中,就是新建了一个Node,为什么掉用两次startNode呢,因为AST的顶层Node是File类型,其有一个属性program,需要新建另一个Node,这两个Node的start、loc信息一样。
| export class NodeUtils extends UtilParser {
startNode<T: NodeType>(): T {
return new Node(this, this.state.start, this.state.startLoc);
}
}
|
进入nextToken,其在Tokenizer中,主要逻辑是判断当前位置是否已经大于输入的长度,如果是的话,调用finishToken去结束token,否则调用getTokenFromCode或者readTmplToken,去从code中读取token。
这里的ct.template就是以反引号开头,我们的例子是const a = 1,会走到getTokenFromCode。
this.codePointAtPos(this.state.pos)会获取当前字符,我们的例子中是c。
| export default class Tokenizer extends ParserErrors {
nextToken(): void {
  const curContext = this.curContext();
  if (!curContext.preserveSpace) this.skipSpace();
  this.state.start = this.state.pos;
  if (!this.isLookahead) this.state.startLoc = this.state.curPosition();
  if (this.state.pos >= this.length) {
    this.finishToken(tt.eof);
    return;
  }

  if (curContext === ct.template) {
    this.readTmplToken();
  } else {
    this.getTokenFromCode(this.codePointAtPos(this.state.pos));
  }
}
}
|
getTokenFromCode会对传入的code做判断,是否是点号、左右括号、逗号、数字等,我们的例子中会走到default,调用isIdentifierStart判断是否是标志符的开始,是的话调用readWord读取一个完整的token。
| getTokenFromCode(code: number): void {
switch (code) {
// The interpretation of a dot depends on whether it is followed
// by a digit or another two dots.
case charCodes.dot:
this.readToken_dot();
return;
// Punctuation tokens.
case charCodes.leftParenthesis:
++this.state.pos;
this.finishToken(tt.parenL);
return;
case charCodes.rightParenthesis:
++this.state.pos;
this.finishToken(tt.parenR);
return;
case charCodes.semicolon:
++this.state.pos;
this.finishToken(tt.semi);
return;
case charCodes.comma:
++this.state.pos;
this.finishToken(tt.comma);
return;
// ...
default:
if (isIdentifierStart(code)) {
this.readWord(code);
return;
}
}
}
|
isIdentifierStart的核心就是对字符的unicode编码做判断:
- 如果code编码小于大写的A的编码(65),只有code是$符号才为true
- 如果code编码介于A-Z之间(65-90),则为true
- 如果code编码在大写Z和小写的a之间(91-96),只有code是下划线_才会true
- 如果code编码介于a-z之间(97-122),则为true
- 如果code编码小于65535,且大于170,并且不以特殊的ASCII字符开头才为true
- 如果code编码大于65535,通过isInAstralSet判断是否是合法标志符
| export function isIdentifierStart(code: number): boolean {
if (code < charCodes.uppercaseA) return code === charCodes.dollarSign;
if (code <= charCodes.uppercaseZ) return true;
if (code < charCodes.lowercaseA) return code === charCodes.underscore;
if (code <= charCodes.lowercaseZ) return true;
if (code <= 0xffff) {
return (
code >= 0xaa && nonASCIIidentifierStart.test(String.fromCharCode(code))
);
}
return isInAstralSet(code, astralIdentifierStartCodes);
}
|
在这里我们的c可以作为标志符开头,进入readWord。
readWord还是在Tokenizer中,作用是读取一个完整的关键字或者标志符。
它首先调用了readWord1,readWord1则会通过isIdentifierChar判断当前字符是否可以做标志符,来给它的位置pos加1,也就是向后移动。
我们的例子中,ch为const的下一个空格的时候会跳出循环,此时state.pos为5,得到的word为const。
然后判断word的类型,是否是关键字。keywordTypes是一个Map,其key是各种关键字或者符号等,value是一个数字。这里const属于关键字,其对应的value是67,也就是type为67。然后调用tokenLabelName。
tokenLabelName会根据type获取token对应的标签,const对应的标签是_const。
这里顺便看一下word不是关键字的逻辑,readWord会把word当作用户的自定义变量,比如例子中的a。
| // Read an identifier or keyword token. Will check for reserved
// words when necessary.
readWord(firstCode: number | void): void {
const word = this.readWord1(firstCode);
const type = keywordTypes.get(word);
if (type !== undefined) {
// We don't use word as state.value here because word is a dynamic string
// while token label is a shared constant string
this.finishToken(type, tokenLabelName(type));
} else {
this.finishToken(tt.name, word);
}
}
readWord1(firstCode: number | void): string {
this.state.containsEsc = false;
let word = "";
const start = this.state.pos;
let chunkStart = this.state.pos;
if (firstCode !== undefined) {
this.state.pos += firstCode <= 0xffff ? 1 : 2;
}
while (this.state.pos < this.length) {
const ch = this.codePointAtPos(this.state.pos);
if (isIdentifierChar(ch)) {
this.state.pos += ch <= 0xffff ? 1 : 2;
} else if (ch === charCodes.backslash) {
this.state.containsEsc = true;
word += this.input.slice(chunkStart, this.state.pos);
const escStart = this.state.pos;
const identifierCheck =
this.state.pos === start ? isIdentifierStart : isIdentifierChar;
if (this.input.charCodeAt(++this.state.pos) !== charCodes.lowercaseU) {
this.raise(this.state.pos, Errors.MissingUnicodeEscape);
chunkStart = this.state.pos - 1;
continue;
}
++this.state.pos;
const esc = this.readCodePoint(true);
if (esc !== null) {
if (!identifierCheck(esc)) {
this.raise(escStart, Errors.EscapedCharNotAnIdentifier);
}
word += String.fromCodePoint(esc);
}
chunkStart = this.state.pos;
} else {
break;
}
}
return word + this.input.slice(chunkStart, this.state.pos);
}
|
接着进入finishToken。
finishToken就是设置end、type、value属性,因为此时已经读取了一个完整的token,可以获取到它的结束位置、类型和真正的值了。
| finishToken(type: TokenType, val: any): void {
this.state.end = this.state.pos;
const prevType = this.state.type;
this.state.type = type;
this.state.value = val;
if (!this.isLookahead) {
this.state.endLoc = this.state.curPosition();
this.updateContext(prevType);
}
}
|
回到Parser的parse方法,之后会进入
- parseTopLevel =>
- parseProgram =>
- parseBlockBody =>
- parseBlockOrModuleBlockBody =>
- parseStatement =>
- parseStatementContent,也就是解析语句。
| parseBlockOrModuleBlockBody(
body: N.Statement[],
directives: ?(N.Directive[]),
topLevel: boolean,
end: TokenType,
afterBlockParse?: (hasStrictModeDirective: boolean) => void,
): void {
const oldStrict = this.state.strict;
let hasStrictModeDirective = false;
let parsedNonDirective = false;
while (!this.match(end)) {
const stmt = this.parseStatement(null, topLevel);
if (directives && !parsedNonDirective) {
if (this.isValidDirective(stmt)) {
const directive = this.stmtToDirective(stmt);
directives.push(directive);
if (
!hasStrictModeDirective &&
directive.value.value === "use strict"
) {
hasStrictModeDirective = true;
this.setStrict(true);
}
continue;
}
parsedNonDirective = true;
// clear strict errors since the strict mode will not change within the block
this.state.strictErrors.clear();
}
body.push(stmt);
}
if (afterBlockParse) {
afterBlockParse.call(this, hasStrictModeDirective);
}
if (!oldStrict) {
this.setStrict(false);
}
this.next();
}
|
parseStatementContent根据startType类型解析不同的声明,比如function/do/while/break等,这里是const,会进入parseVarStatement。
| export default class StatementParser extends ExpressionParser {
parseStatement(context: ?string, topLevel?: boolean): N.Statement {
if (this.match(tt.at)) {
this.parseDecorators(true);
}
return this.parseStatementContent(context, topLevel);
}
parseStatementContent(context: ?string, topLevel: ?boolean): N.Statement {
let starttype = this.state.type;
const node = this.startNode();
let kind;
if (this.isLet(context)) {
starttype = tt._var;
kind = "let";
}
// Most types of statements are recognized by the keyword they
// start with. Many are trivial to parse, some require a bit of
// complexity.
switch (starttype) {
case tt._break:
return this.parseBreakContinueStatement(node, /* isBreak */ true);
case tt._continue:
return this.parseBreakContinueStatement(node, /* isBreak */ false);
case tt._debugger:
return this.parseDebuggerStatement(node);
case tt._do:
return this.parseDoStatement(node);
case tt._for:
return this.parseForStatement(node);
case tt._function:
// ...
case tt._const:
case tt._var:
kind = kind || this.state.value;
if (context && kind !== "var") {
this.raise(this.state.start, Errors.UnexpectedLexicalDeclaration);
}
return this.parseVarStatement(node, kind);
// ...
}
}
parseVarStatement(
node: N.VariableDeclaration,
kind: "var" | "let" | "const",
): N.VariableDeclaration {
this.next();
this.parseVar(node, false, kind);
this.semicolon();
return this.finishNode(node, "VariableDeclaration");
}
}
|
parseVarStatement又会调用next => nextToken,去解析下一个token,这个例子中是a。
| next(): void {
this.checkKeywordEscapes();
if (this.options.tokens) {
this.pushToken(new Token(this.state));
}
this.state.lastTokEnd = this.state.end;
this.state.lastTokStart = this.state.start;
this.state.lastTokEndLoc = this.state.endLoc;
this.state.lastTokStartLoc = this.state.startLoc;
this.nextToken();
}
|
parseVarStatement之后会进入parseVar,parseVar会新建一个node,作为var声明,然后调用eat.
| parseVar(
node: N.VariableDeclaration,
isFor: boolean,
kind: "var" | "let" | "const",
): N.VariableDeclaration {
const declarations = (node.declarations = []);
const isTypescript = this.hasPlugin("typescript");
node.kind = kind;
for (;;) {
const decl = this.startNode();
this.parseVarId(decl, kind);
if (this.eat(tt.eq)) {
decl.init = isFor
? this.parseMaybeAssignDisallowIn()
: this.parseMaybeAssignAllowIn();
} else {
if (
kind === "const" &&
!(this.match(tt._in) || this.isContextual(tt._of))
) {
// `const` with no initializer is allowed in TypeScript.
// It could be a declaration like `const x: number;`.
if (!isTypescript) {
this.raise(
this.state.lastTokEnd,
Errors.DeclarationMissingInitializer,
"Const declarations",
);
}
} else if (
decl.id.type !== "Identifier" &&
!(isFor && (this.match(tt._in) || this.isContextual(tt._of)))
) {
this.raise(
this.state.lastTokEnd,
Errors.DeclarationMissingInitializer,
"Complex binding patterns",
);
}
decl.init = null;
}
declarations.push(this.finishNode(decl, "VariableDeclarator"));
if (!this.eat(tt.comma)) break;
}
return node;
}
|
eat方法在Tokenizer中,这里会调用next => nextToken => getTokenFromCode => ReadNumber,解析下一个字符也就是1。然后返回true,进入parseMaybeAssignDisallowIn。
parseMaybeAssignDisallowIn这里不再展开了,最后会得到一个type为NumericLiteral类型的Node的节点,并赋值给dcl.init。
之后在parseVar中调用declarations.push(this.finishNode(decl, "VariableDeclarator")),结束VariableDeclarator这个Node的解析。
| eat(type: TokenType): boolean {
if (this.match(type)) {
this.next();
return true;
} else {
return false;
}
}
|
回到parseVarStatement中,最后调用this.finishNode(node, "VariableDeclaration")结束VariableDeclaration这个Node的解析。
回到parseBlockOrModuleBlockBody中,smt解析完后会放到body中,然后再次调用next => nextToken,这次state.pos为11,this.length也是11,会调用finishToken(tt.eof)。
回到parseProgram中,调用finishNode(program, "Program"),结束program的解析。
再回到parseTopLevel中,调用this.finishNode(file, "File"),结束File的解析。
| nextToken(): void {
const curContext = this.curContext();
if (!curContext.preserveSpace) this.skipSpace();
this.state.start = this.state.pos;
if (!this.isLookahead) this.state.startLoc = this.state.curPosition();
if (this.state.pos >= this.length) {
this.finishToken(tt.eof);
return;
}
if (curContext === ct.template) {
this.readTmplToken();
} else {
this.getTokenFromCode(this.codePointAtPos(this.state.pos));
}
}
|
总结下@babel/parser对const a = 1的解析主流程:
- 新建
File类型的Node,暂命名为NodeA;
- 新建
Program类型的Node,命名为NodeB;
- 解析
token,获取const;
- 进入
parser,进入parseVarStatement,新建VariableDeclaration的Node,命名为NodeC;
- 调用
next再解析一个token,得到a;
- 进入
parseVar,新建VariableDeclarator的Node,命名为NodeD;
- 调用
eat,因为下一个字符为=,继续调用next,解析下一个字符1;
- 进入
parseMaybeAssignDisallowIn获取NumericLiteral类型的Node,命名为NodeE;
- 将
NodeE赋值给NodeD的init属性;
- 将
NodeD赋值给NodeC的declarations属性;
- 将
NodeC赋值给NodeB的body属性;
- 将
NodeB赋值给NodeA的program属性;
- 返回
File类型的Node节点。
下面贴一下const a = 1这个简单例子的AST(省略了loc/errors/comments等属性),也可以去AST Explorer这个网站查看。
| {
"type": "File",
"start": 0,
"end": 11,
"program": {
"type": "Program",
"start": 0,
"end": 11,
"sourceType": "module",
"interpreter": null,
"body": [
{
"type": "VariableDeclaration",
"start": 0,
"end": 11,
"declarations": [
{
"type": "VariableDeclarator",
"start": 6,
"end": 11,
"id": {
"type": "Identifier",
"start": 6,
"end": 7,
"name": "a"
},
"init": {
"type": "NumericLiteral",
"start": 10,
"end": 11,
"extra": {
"rawValue": 1,
"raw": "1"
},
"value": 1
}
}
],
"kind": "const"
}
],
},
}
|
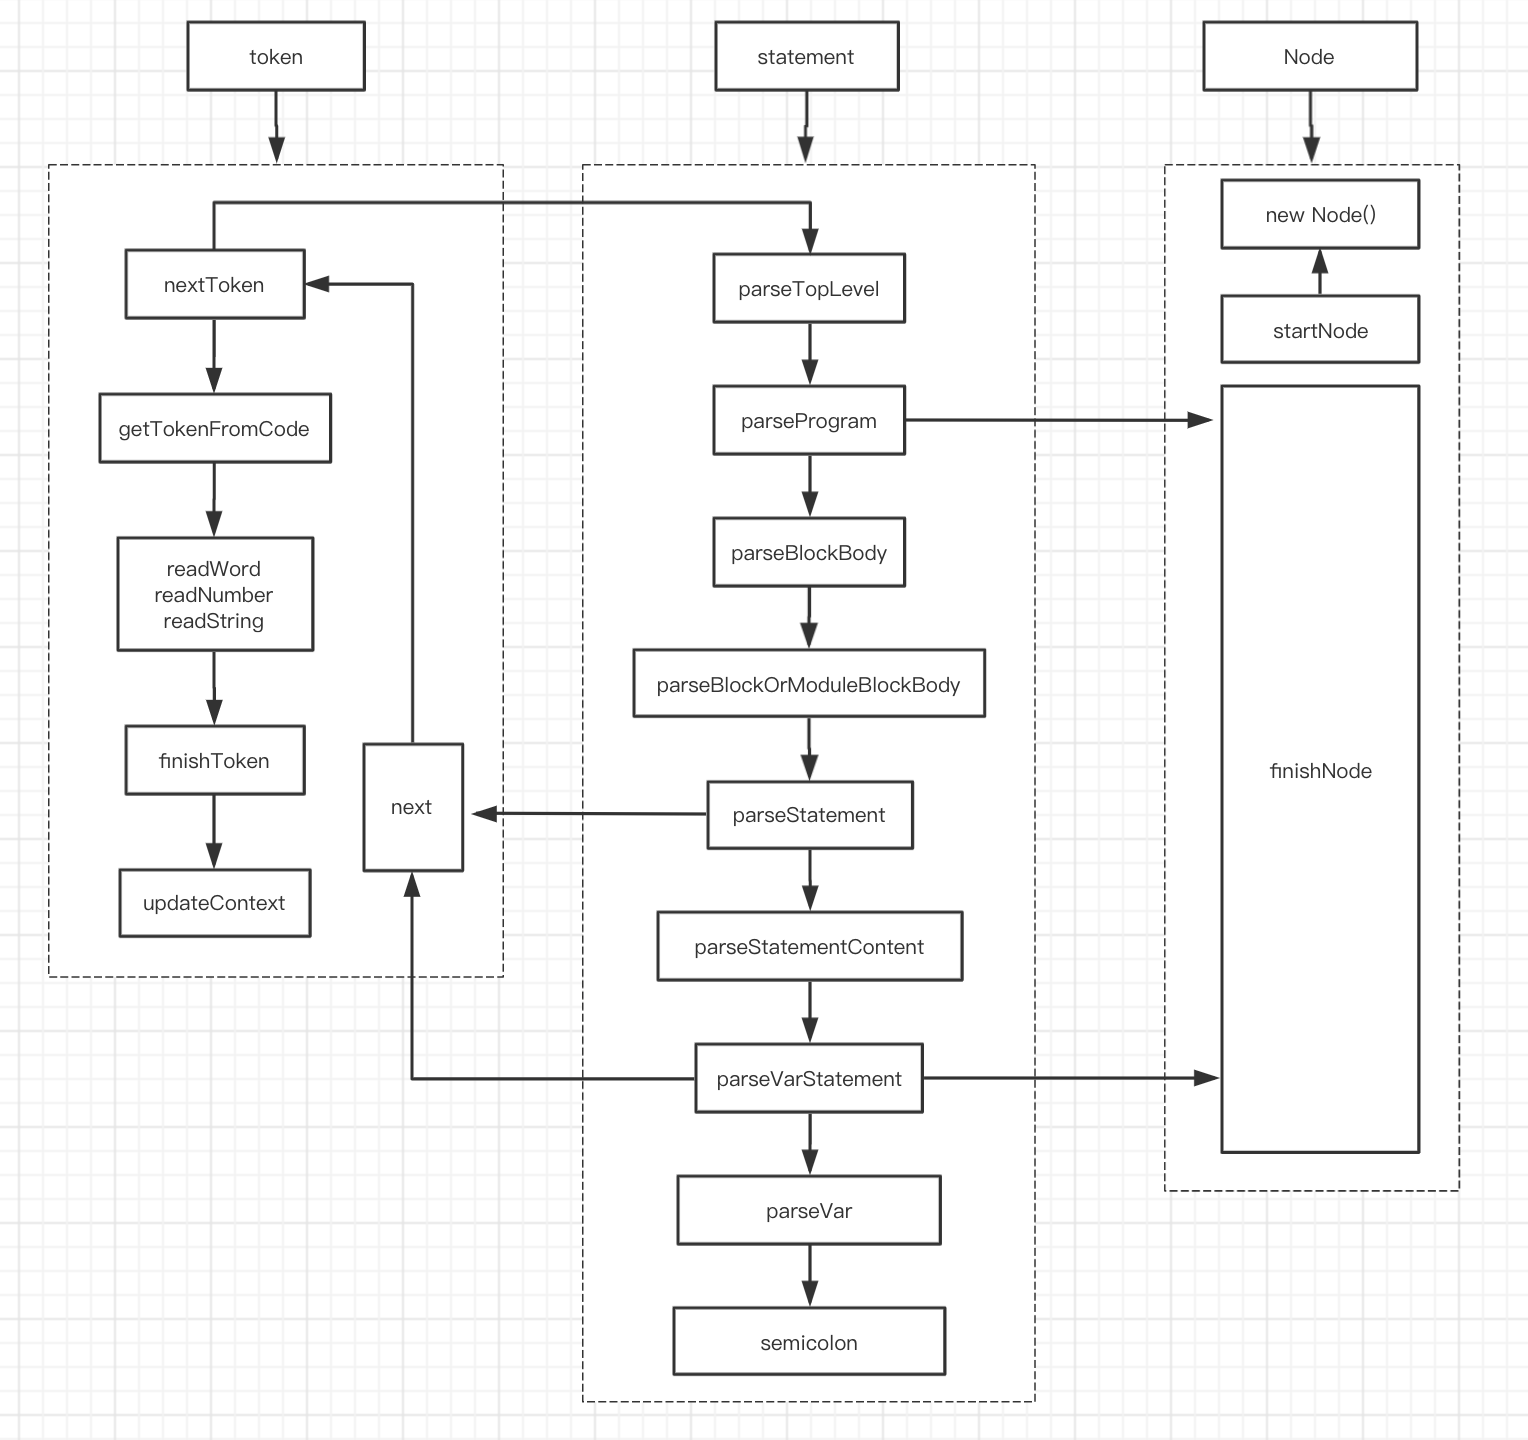
3. 流程图
下面是一张流程图,方便加深理解。
五、总结
通过上面这个例子,可以看出:
- 词法的解析和语法的解析,并不像许多文章中说的那样泾渭分明,不是先整体解析成
token、再将token解析成AST,而是获得第一个token后就进行词法解析,也就是说会同时维护Node和Token。解析过程中,会不断地通过nextToken方法获取下一个Token。
startNode、finishNode,startToken、finishToken是成对存在的,可以理解为栈或洋葱模型。进入一个Node,最后一定会通过finishNode对type/end等属性进行赋值,token也是一样。
本文主要起抛砖引玉作用。对@babel/parser感兴趣的同学,建议深入阅读源码,如果有疑问,欢迎探讨。
六、系列文章
- Babel基础
- Babel源码解析之@babel/core
- Babel源码解析之@babel/parser
- Babel源码解析之@babel/traverse
- Babel源码解析之@babel/generator
七、相关资料
- the-super-tiny-compiler
- babel-handbook
- loose-mode