# 1. 开始
目前在做的几个项目都是基于uni-app的,做了一些性能优化,简单总结下。
# 2. H5方向
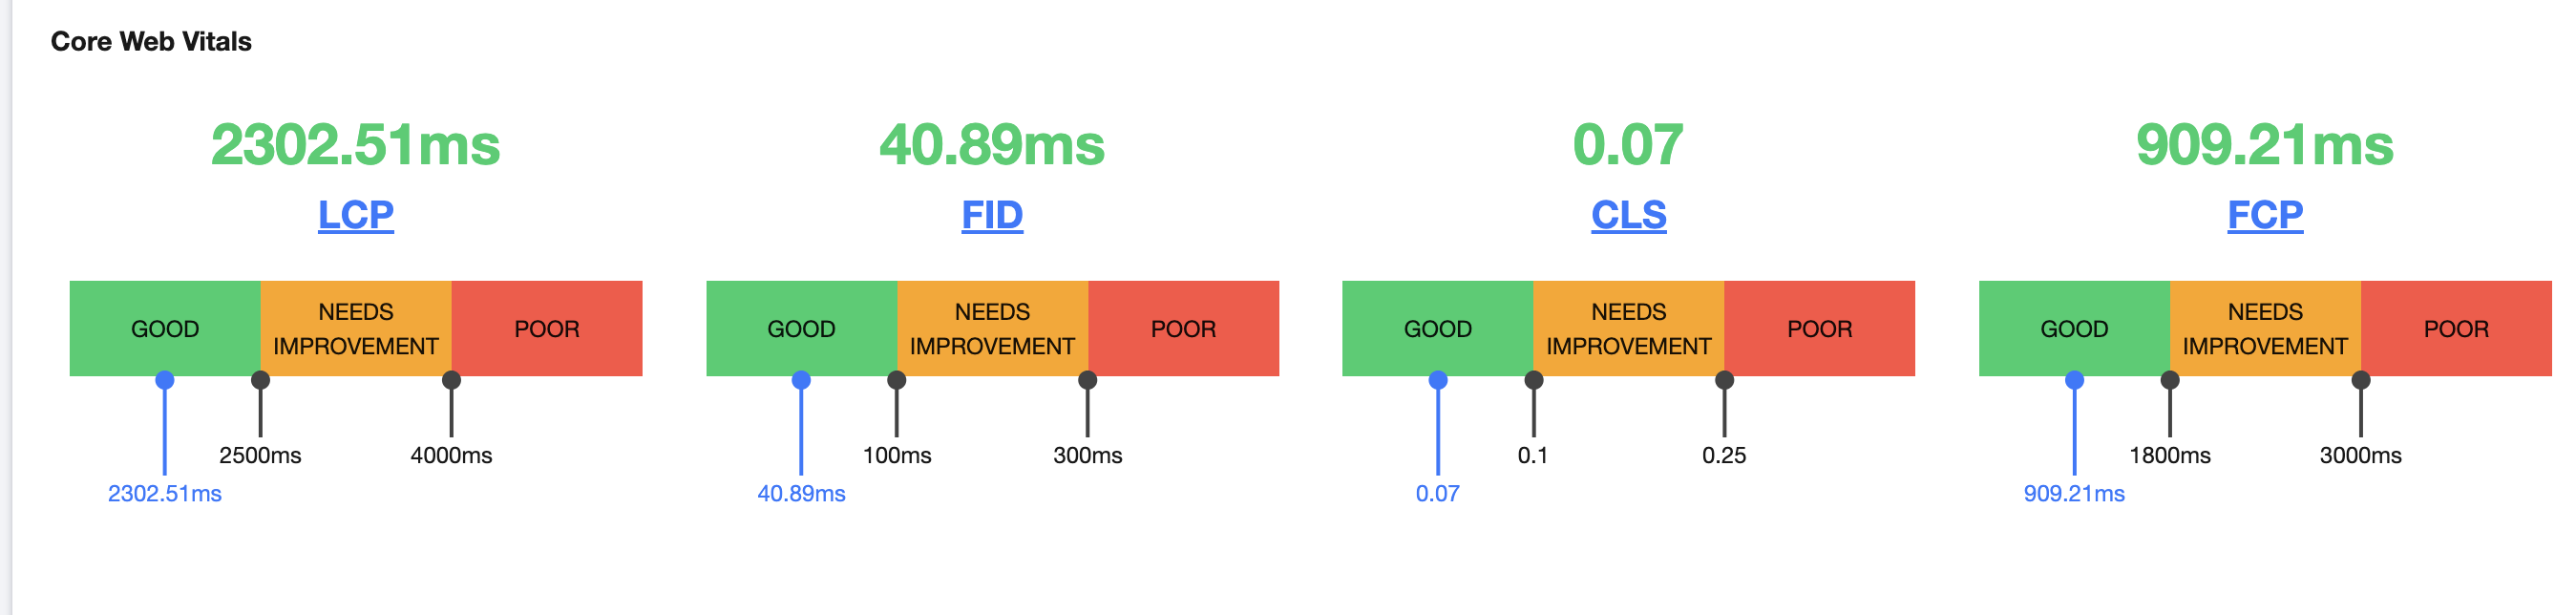
# 2.1. FCP 优化
First Contentful Paint 标记了绘制出首个文本或首张图片的时间。
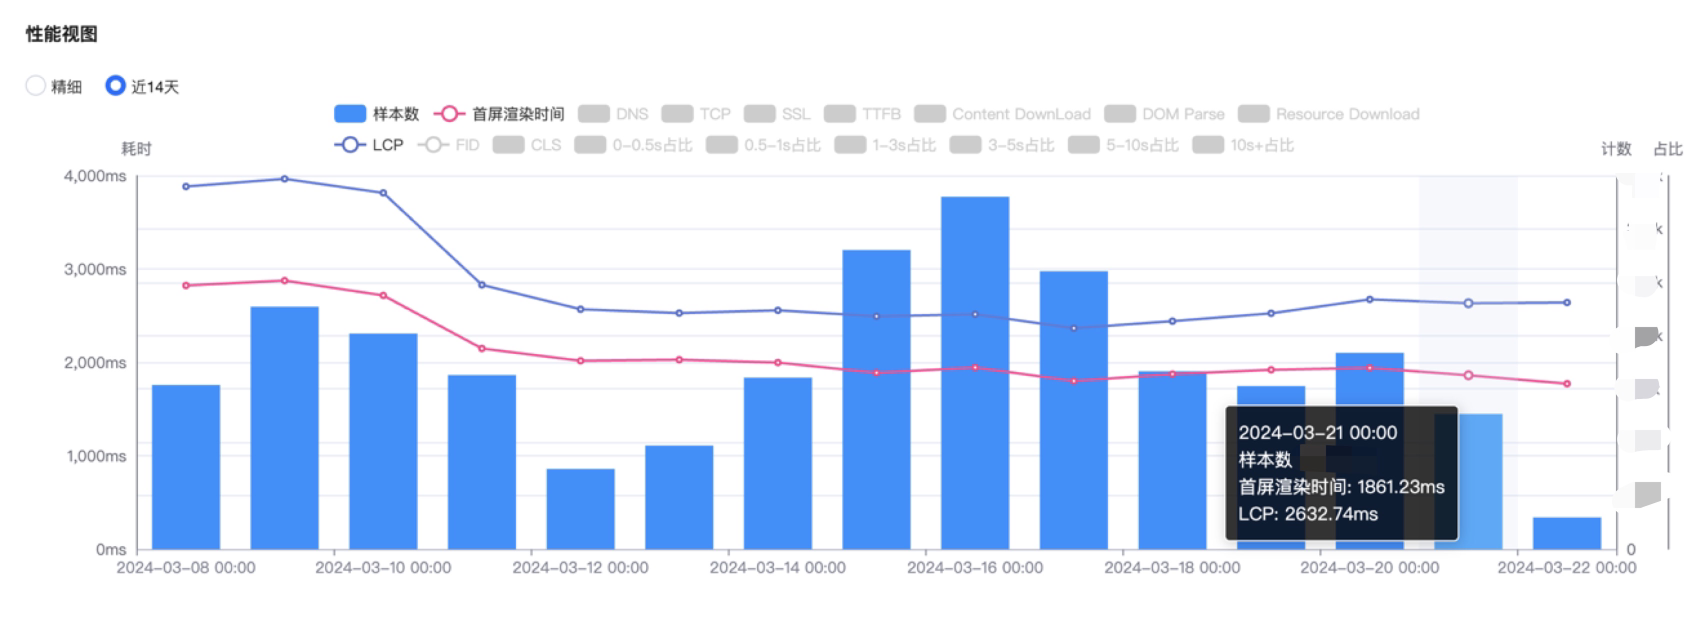
当前现状,lighthouse 截图:
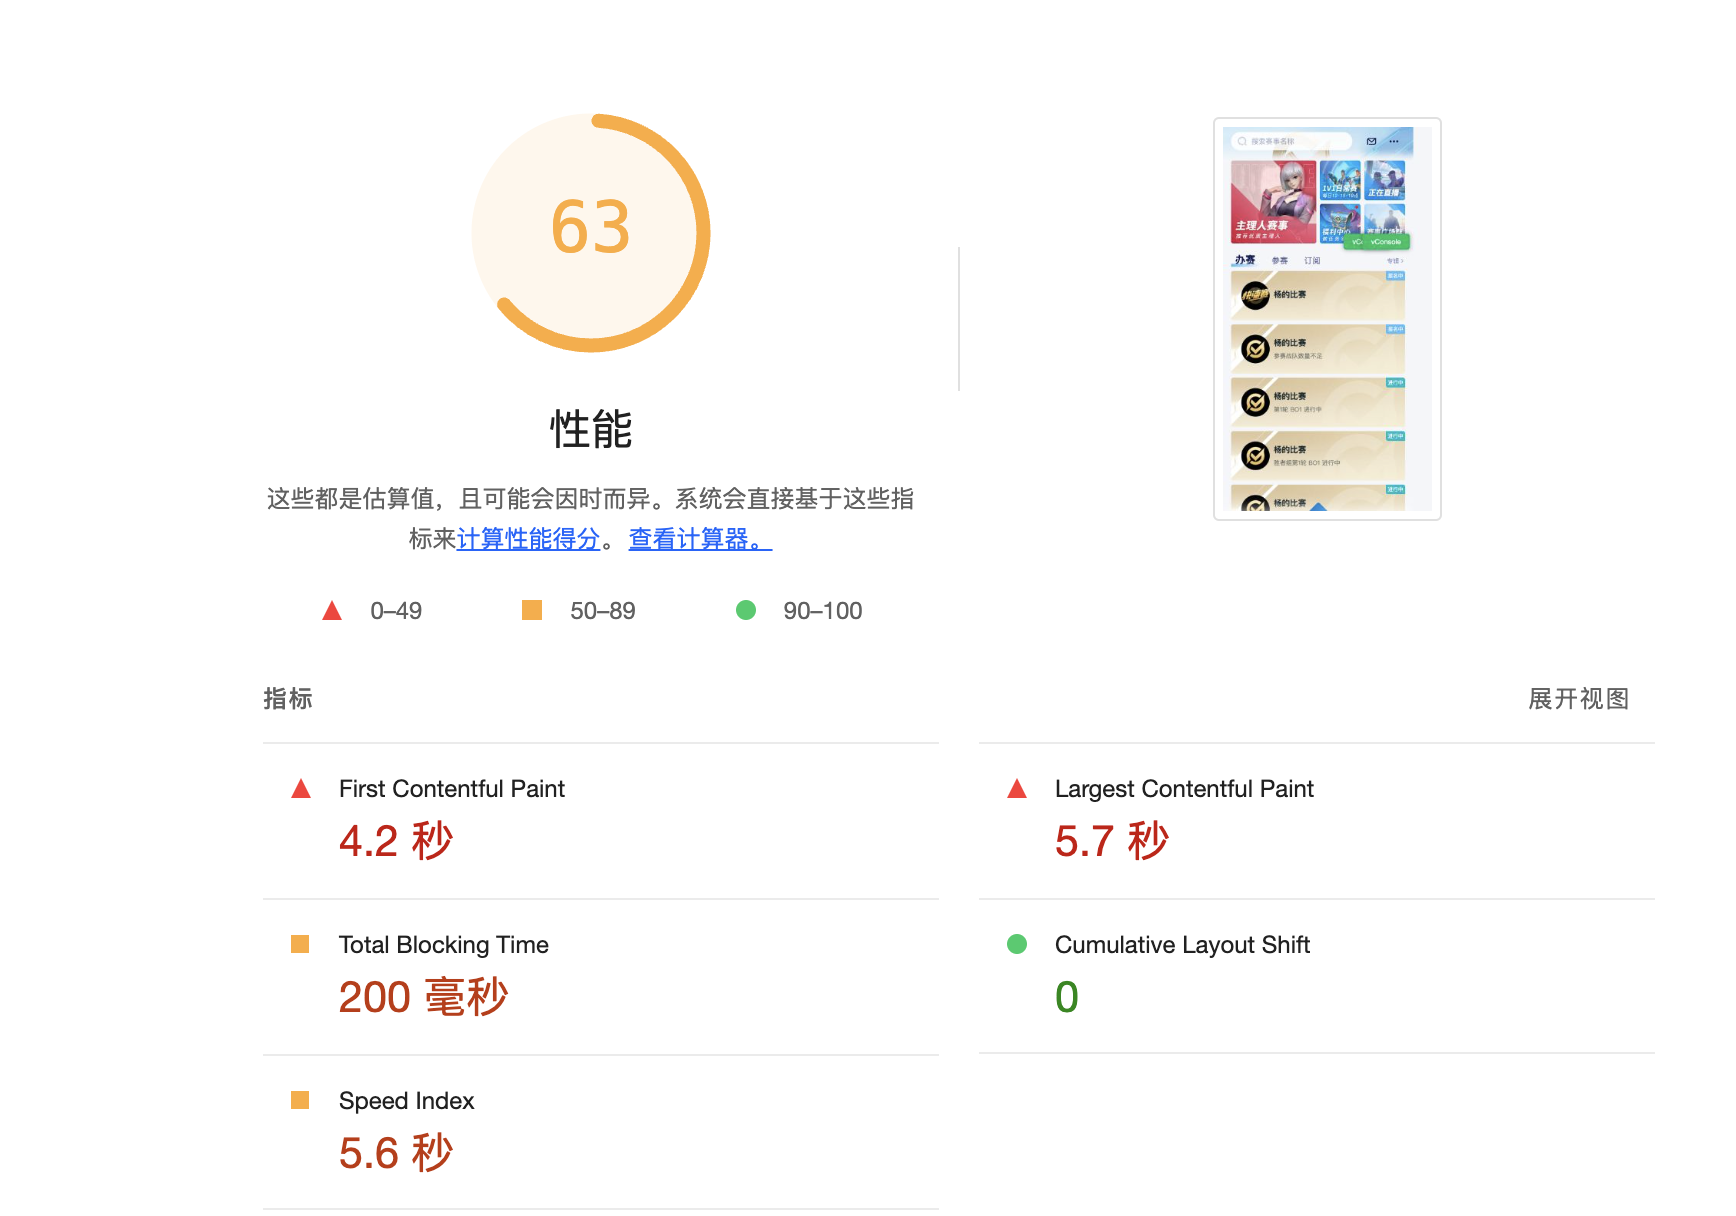
项目 FCP 耗时长,之前为 4.2 秒左右。可以通过在 index.html 中加个 loading,并在 DOMContentLoaded 事件发生时,去掉此DOM。
大致代码如下:
<script>
  !function () {
    var i = document.createElement("div");
    i.innerHTML = '<style>.pre-loading{}</style><div class="pre-loading"></div>';
    document.body.appendChild(i);
    document.addEventListener("DOMContentLoaded", (function () {
      setTimeout((function () {
        document.body.removeChild(i)
      }))
    }))
  }()
</script>
有几个注意点:
- 不要放到所有非异步脚本的后面,否则会等前面的脚本加载完才执行,太慢了
- 不要用
loading图片,因为图片加载也需要时间,可以直接用样式控制
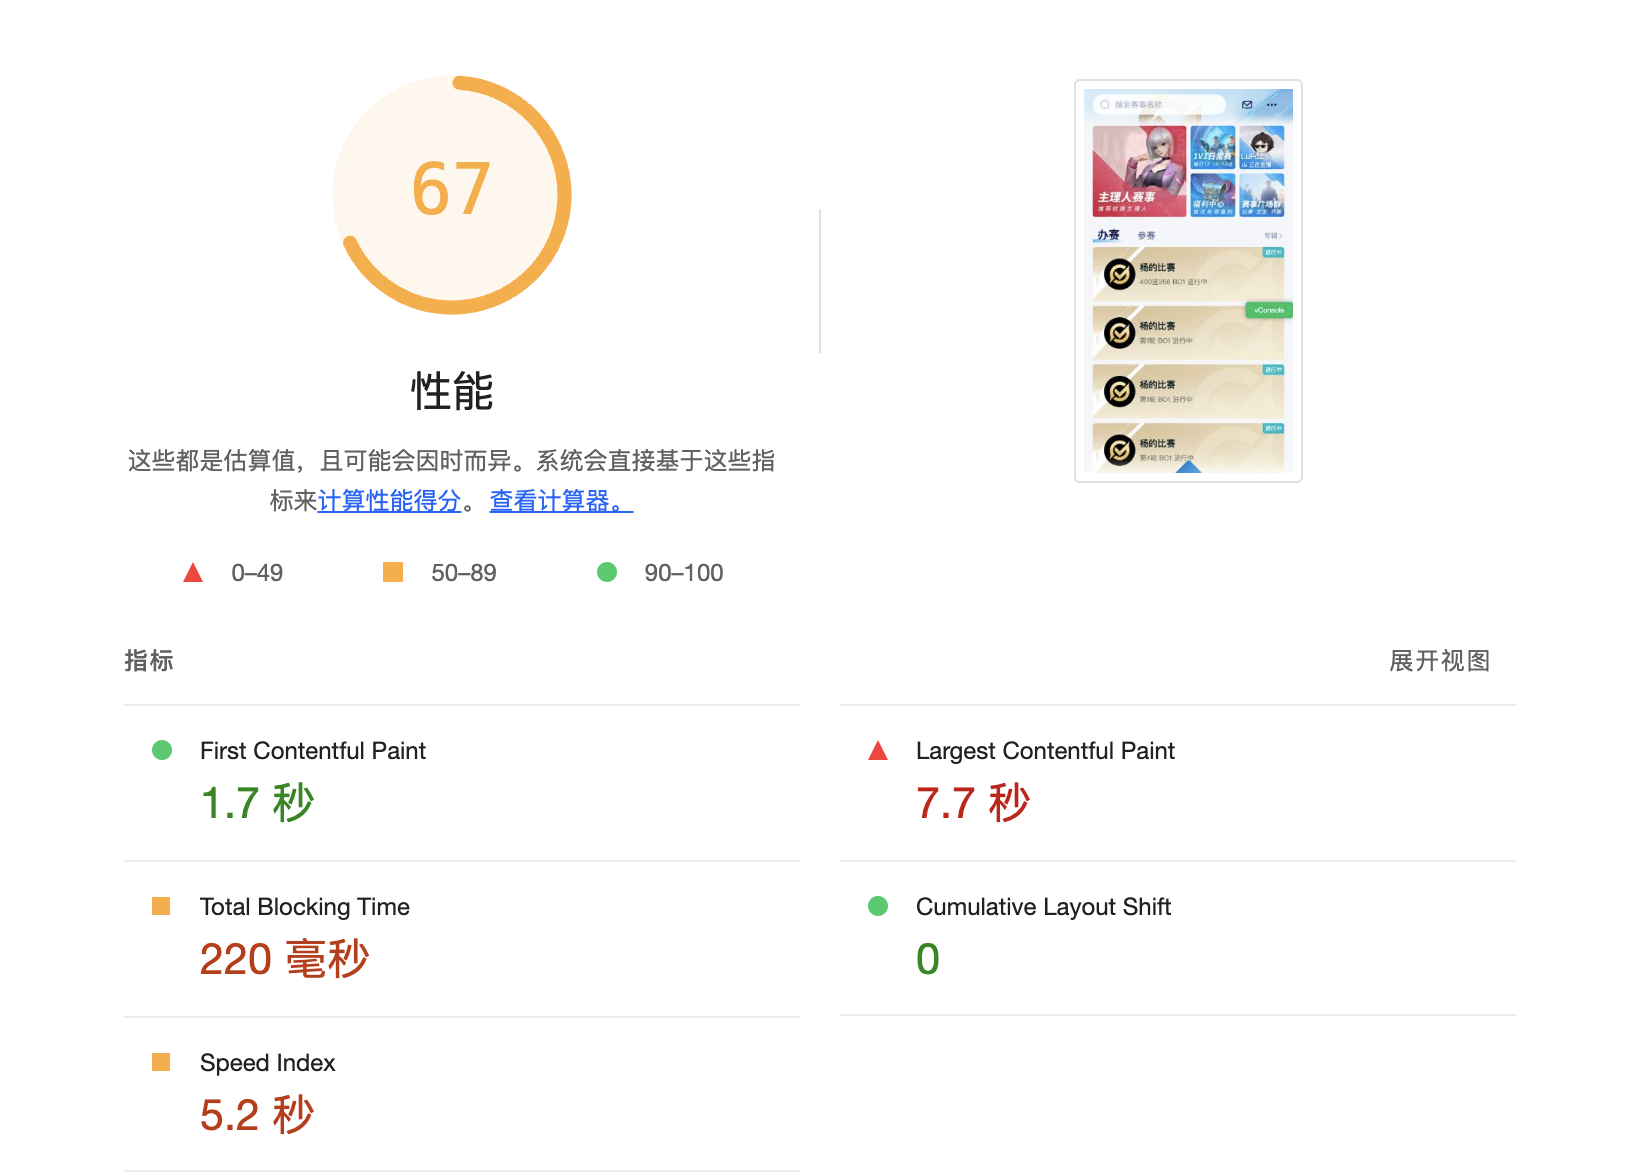
优化前后对比:


优化效果,FCP降低到 1.7 秒。
体验地址:https://h5-test.nes.smoba.qq.com/pvpesport.web.user.develop/#/ 体验方法:模拟弱网
多说一句,这个指标是有实际意义的,有 loading 的用户体验会好很多,用户可以知道这个页面是可以反应的。像小程序第一次加载以及分包加载,也都有 loading。
# 2.2. Split Chunk 优化
uni-app 源码中,packages/vue-cli-plugin-uni/lib/h5/index.js 可以看到 uni-app 给出的 chunk 配置。
const vueConfig = {
  pages: {
    // 在这个页面中包含的块,默认情况下会包含
    // 提取出来的通用 chunk 和 vendor chunk。
    chunks: ['chunk-vendors', 'chunk-common', 'index'],
  }
}
pages.chunks 取自 webpack 插件 html-webpack-plugin 里面的 chunks 属性,在打包的时候会被插入到入口文件 index.html 里面。
这里的 pages 配置会传给 html-webpack-plugin,转化成的 webpack 配置如下:
optimization: {
  splitChunks: {
    cacheGroups: {
      vendors: {
        name: 'chunk-vendors',
        test: /[\\/]node_modules[\\/]/,
        priority: -10,
        chunks: 'initial'
      },
      common: {
        name: 'chunk-common',
        minChunks: 2,
        priority: -20,
        chunks: 'initial',
        reuseExistingChunk: true
      }
    }
  }
}
通过分析打包产物,可以看出 chunk-vendors 内部有很多稳定的包,可以把它们拆出来。

结合自身项目,进行如下拆分:
pages: {
  index: {
    entry: path.resolve(process.env.UNI_INPUT_DIR!, getMainEntry()),
    // 模板来源
    template,
    filename: 'index.html',
    title,
    publicPath,
    chunks: [
      'uni-h5',
      'core-js',
      'chunk-vendors',
      'index',
    ],
  },
},
chainWebpack(config: any) {
  config.optimization.splitChunks({
    minChunks: 1,
    maxInitialRequests: 10,

    cacheGroups: {
      tim_js_sdk: {
        name: 'tim-js-sdk',
        test: /[\\/]node_modules[\\/]_?tim-js-sdk(.*)/,
        priority: 15,
        chunks: 'all',
        // minSize: 0,
        reuseExistingChunk: true,
      },
      uni_h5: {
        name: 'uni-h5',
        test: /uni-h5[\\/]_?dist[\\/]_?index\.umd\.min\.js/,
        chunks: 'initial',
        priority: 5,
        reuseExistingChunk: true,
      },
      core_js: {
        name: 'core-js',
        test: /[\\/]node_modules[\\/]_??core-js(.*)/,
        chunks: 'initial',
        priority: 30,
        reuseExistingChunk: true,
      },
      vendors: {
        name: 'chunk-vendors',
        test: /[\\/]node_modules[\\/]/,
        priority: -10,
        chunks: 'initial',
        reuseExistingChunk: true,
      },
      default: {
        minChunks: 2,
        priority: -20,
        reuseExistingChunk: true,
      },
    },
  });
},
几个心得:
vendors的chunks不能设置为all,否则会把非入口页面的三方库一起打包了。比如其他页面都是异步加载,它们的js应该单独打包,而不是都放在入口的vendors中。
 vendors: {
  name: 'chunk-vendors',
  test: /[\\/]node_modules[\\/]/,
  priority: -10,
  chunks: 'initial',
  reuseExistingChunk: true,
},
maxInitialRequests表示入口的最大并行请求数,它应该设置较大的数值,默认是3,当你拆出来的chunks比较多,这个数字根本不够用,造成的结果就是设置的cacheGroups不生效。
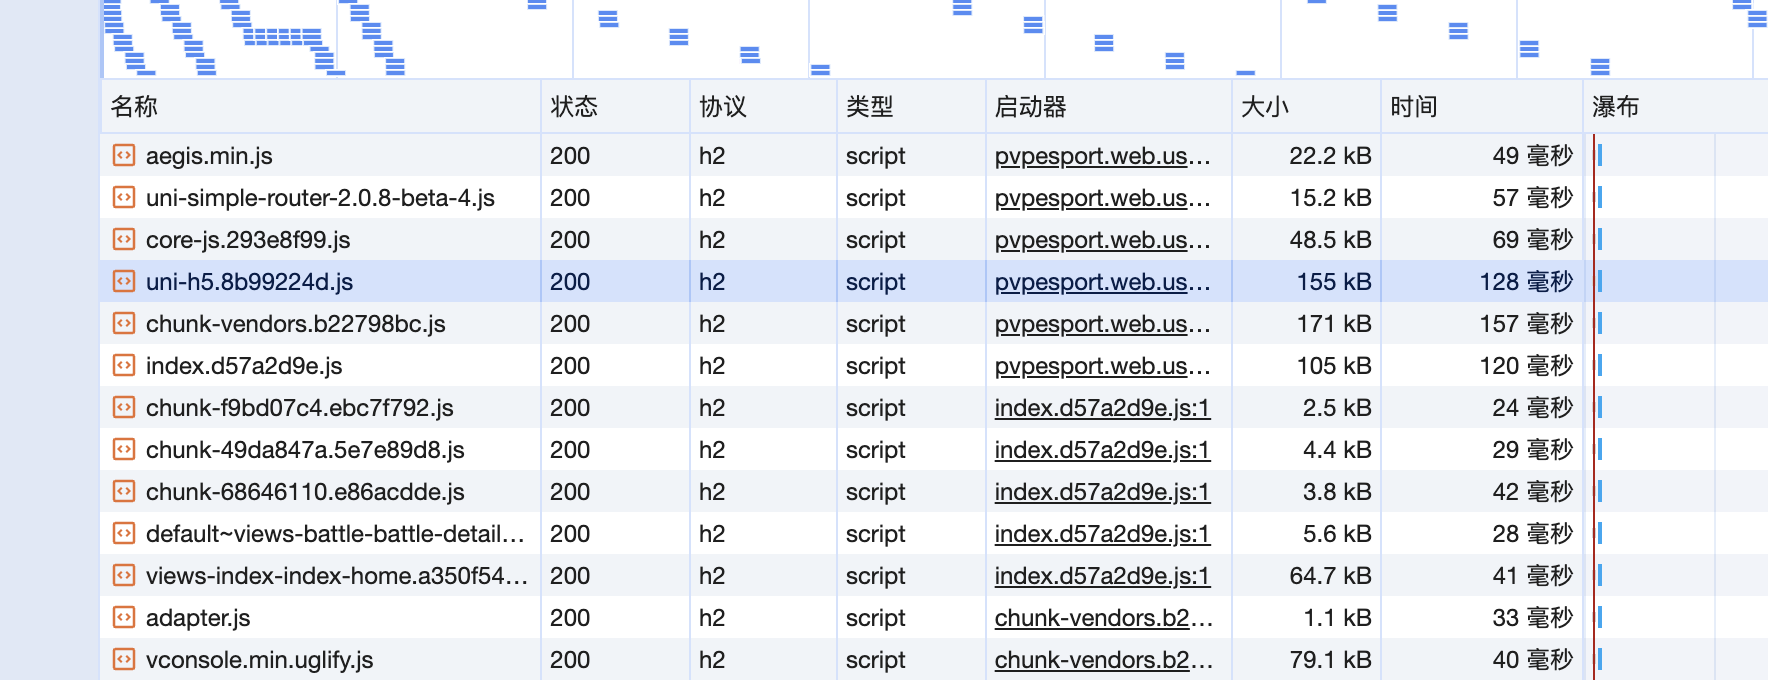
效果:
通过 splitCHunks 的拆分,一些内容不变的包的 hash 不会变,从而充分利用了缓存。不过这一点并不能通过 lighthouse 得分进行量化,还需要结合实际观察。
# 2.3. 自定义预加载
基于 uni-app 的项目如果用其自带的 preload 属性,基本没有作用,经过测试,性能还会下降。因为它会把项目所有页面的所有 js 文件,都放到 html 中,并加上 preload 属性。而 preload 属性又基本是黑盒,浏览器的空闲时刻并不能十分确定。所以如果单纯增加 manifest 的 preload,会增加 html 的大小,又没有起到真正的预加载作用,因此性能反而会下降。
但是,预加载本身的思路是没错的,因为通过查看 uni-app 的源码,以及分析页面的加载顺序可以发现,uni-app 是将所有页面都异步加载,即使是首页。这会导致首屏资源的加载时机太靠后。假如首页的 js 文件为 home.js,则加载顺序为:
index.html 加载chunk-vendors.js和index.js(还有其他资源)并行加载home.js加载
可以看到 home.js 的加载时间太靠后了,其实可以提前到和 index.js 同时加载。并且 uni-app 的运行时体积很大,gzip 压缩后还有 106kb,更延缓了首屏的显示。
所以优化思路有两个:
- 减少
chunk-vendors的大小 home.js加载提前
对于第一个方面,可以通过拆包,也就是 split-chunks 解决。一个最近的经验是,根据木桶短板效应,耗时最久的决定加载时间,所以最好将 vendors 拆出来的几个 js 文件大小做的差不多,没有特别耗时的资源,这种情况性能最佳。当然实际情况可能复杂的多,还是要结合项目实际。
对于第二个方面,我做了一个自定义预加载的框架,核心有3个插件:
- 暴露打包模块的
hash值与资源地址的对应关系 - 获取某个页面所需要的所有的模块的
hash值 - 根据用户配置,在运行时插入脚本,执行预加载
下面分别说说这几个插件是干什么的。
Webpack 运行时中,会保存一份资源 hash 和真正的地址的映射关系,内部叫 jsonpScriptSrc,这里需要将其暴露出来 (opens new window),这样才有可能做到自定义加载某个资源。
同时,uni-app 会把所有页面当成异步的组件,源码在这里 packages/webpack-uni-pages-loader/lib/platforms/h5.js。
Vue.component('${name}', resolve=>{
const component = {
  component:require.ensure([], () => resolve(require(${JSON.stringify(path)}+'${ext}')), '${name}'),
  delay:__uniConfig['async'].delay,
  timeout: __uniConfig['async'].timeout
}
所有 pages.json 中注册的页面,都会被上面的代码处理,经过 Webpack 一系列 loader 处理后,打包后的资源大致如下:
e.__uniConfig.__webpack_chunk_load__=n.e,
t["default"].component("views-home-hor-index",
(function(e){var t={component:Promise.all([
  n.e("default~views-home-hor-index~views-owner-ingame-match-game-list-game-list"),
  n.e("views-home-hor-index")
]).then(function(){return e(n("a772"))}.bind(null,n)).catch(n.oe),delay:__uniConfig["async"].delay,timeout:__uniConfig["async"].timeout};return __uniConfig["async"]["loading"]&&(t.loading={name:"SystemAsyncLoading",render:function(e){return e(__uniConfig["async"]["loading"])}}),__uniConfig["async"]["error"]&&(t.error={name:"SystemAsyncError",render:function(e){return e(__uniConfig["async"]["error"])}}),t})),
t["default"].component("views-owner-ingame-match-team-zone-team-zone",
(function(e){var t={component:Promise.all([
  n.e("chunk-2d401669"),
  n.e("default~views-owner-ingame-match-ai-room-ai-room~views-owner-ingame-match-league-room-league-room~vi~fde6b837")
  //...
上面的代码的意思是,每个页面都会先加载1个或多个异步的资源,然后才会渲染。所以如果我们要做自定义预渲染,需要知道一个页面有哪些异步资源,这也就是为什么要有第2个插件。
第3个插件比较容易理解,每个项目的每个页面所需的预加载资源是不同的,所以需要一份配置文件,以及解析配置文件的引擎,还有注入到 index.html 的动态加载逻辑。
整体的思路就是这样,简单一句话总结就是,让首屏资源加载更提前。
# 2.4. tim-sdk 优化
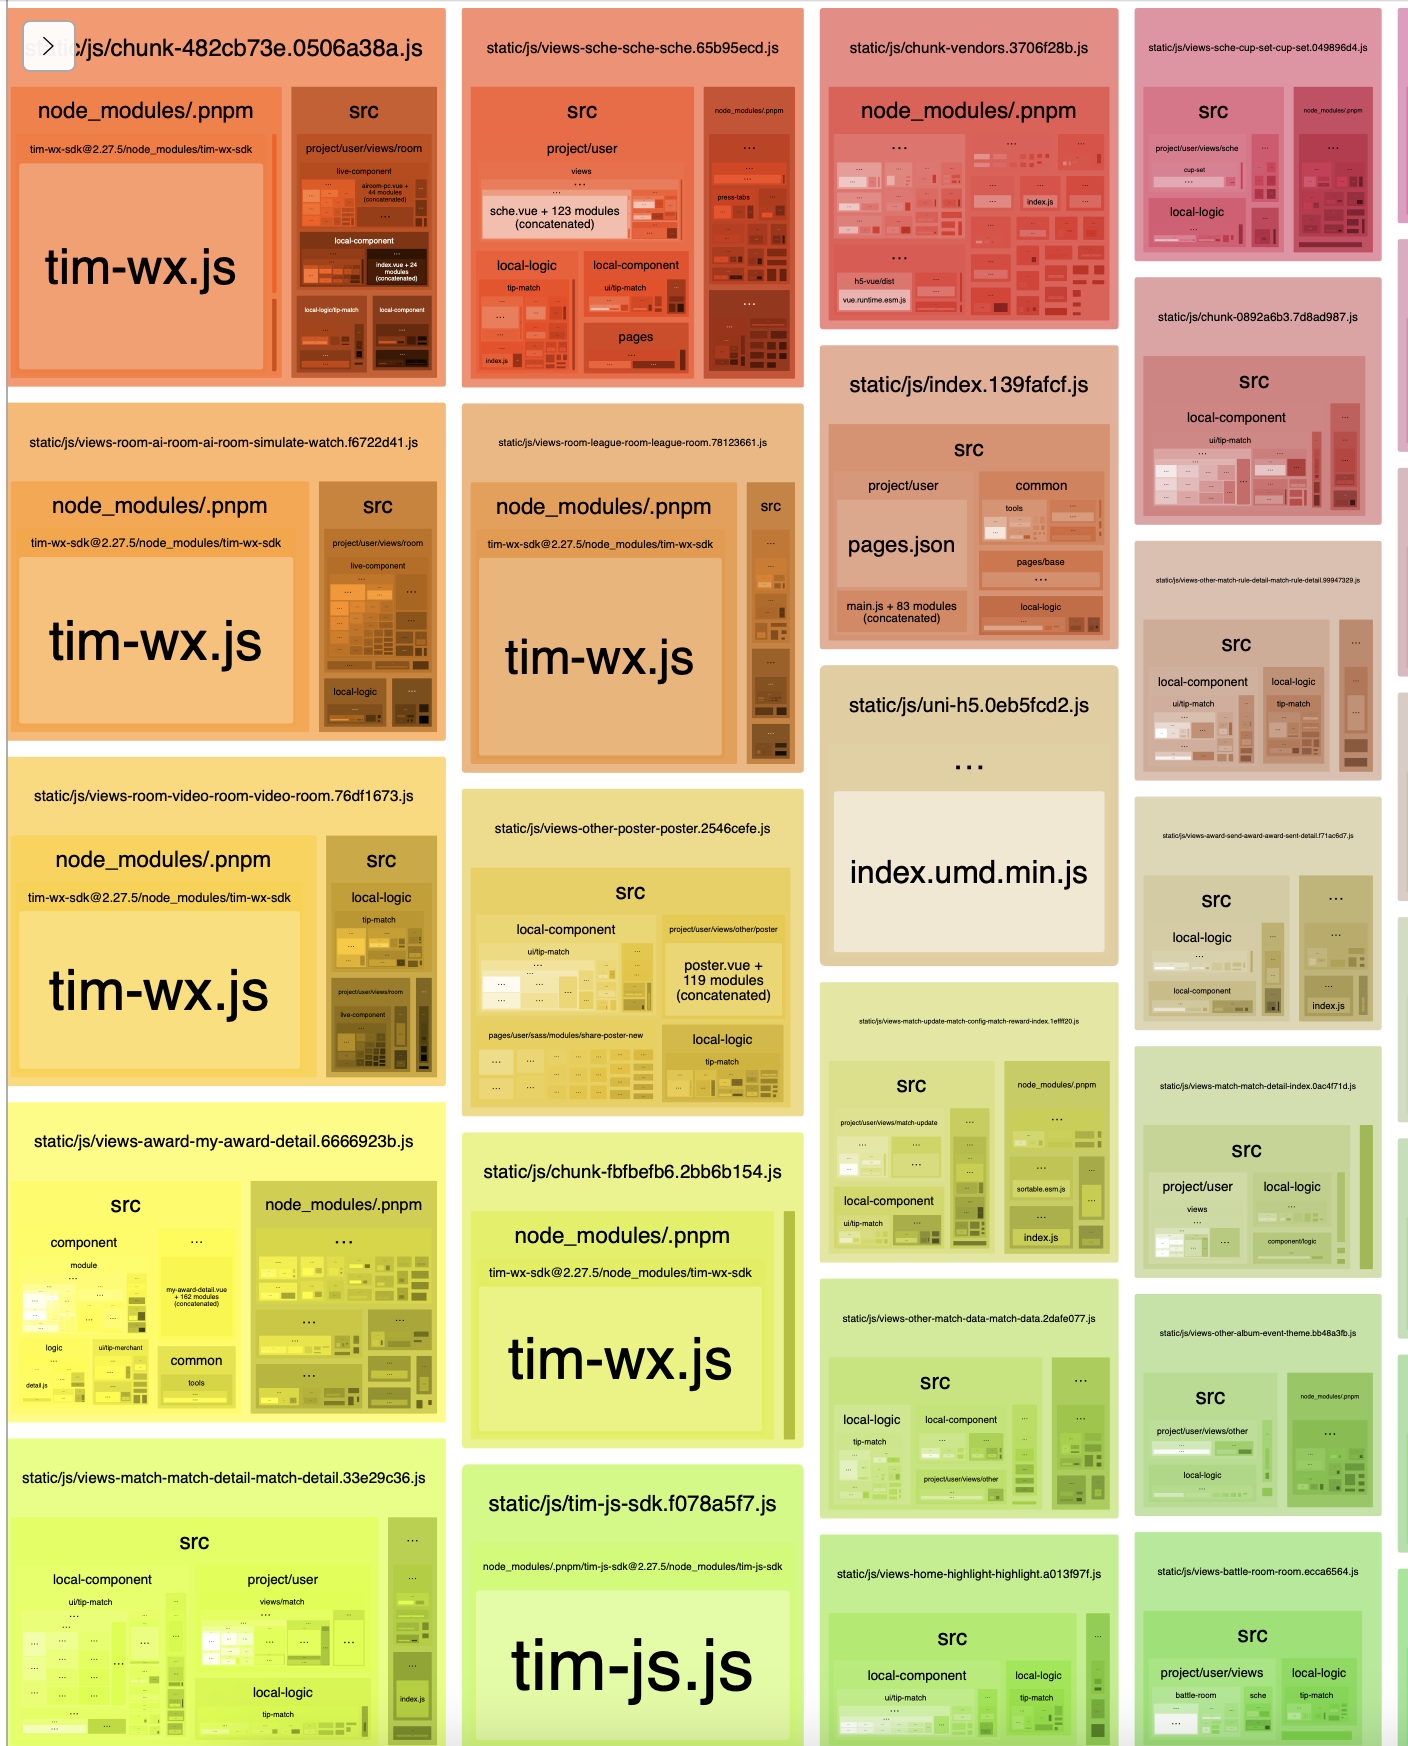
tim-js-sdk 被打包了很多份,导致很多页面都要重新加载,具体看下图:
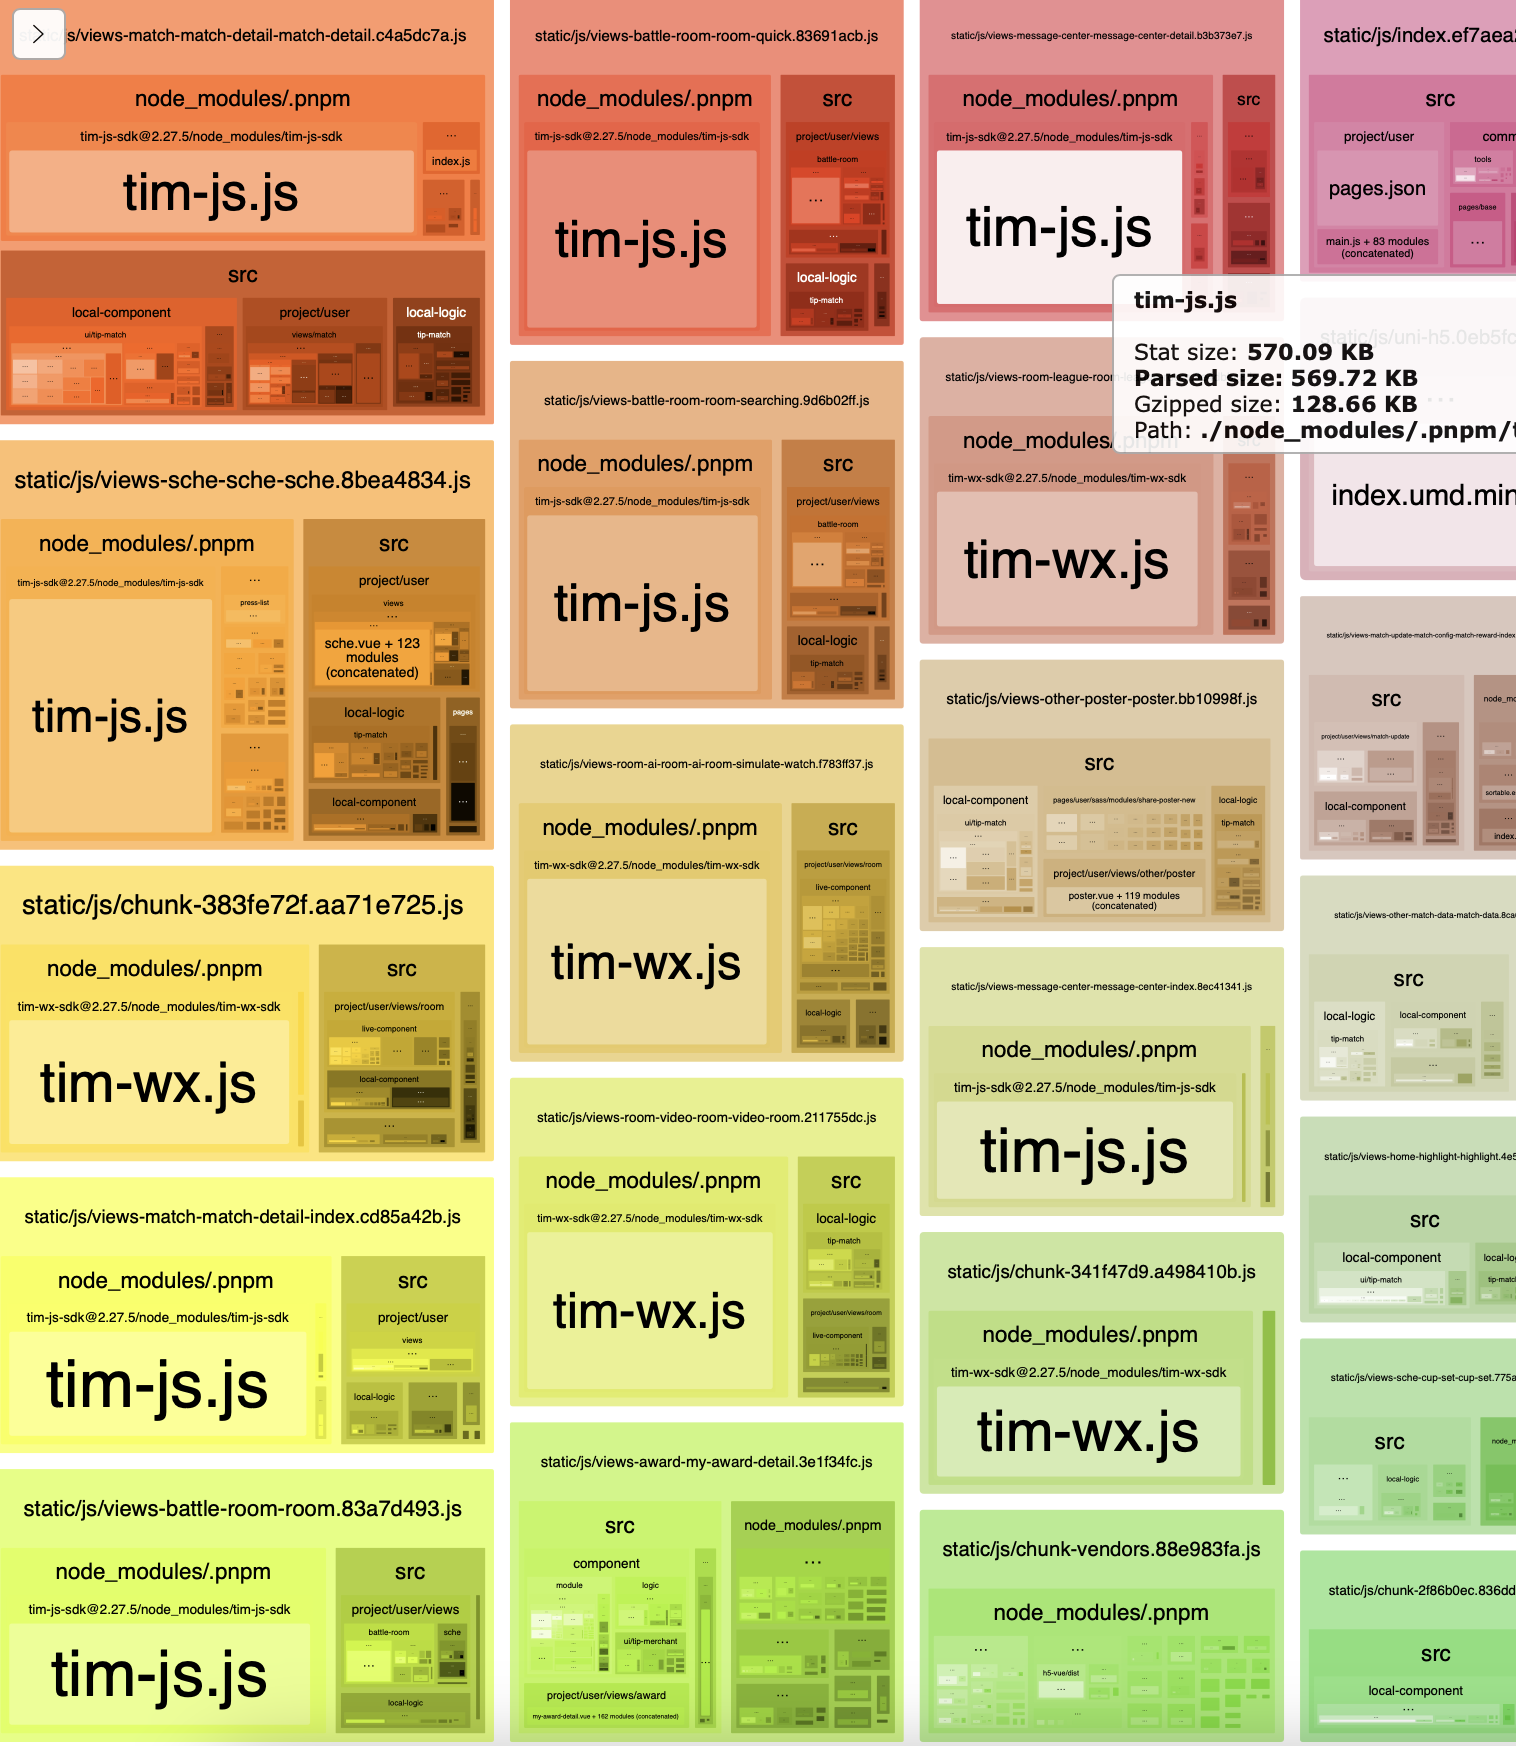
这里用 split-chunks 优化下:
cacheGroups: [
  {
    tim_js_sdk: {
      name: 'tim-js-sdk',
      test: /[\\/]node_modules[\\/]_?tim-js-sdk(.*)/,
      priority: 15,
      chunks: 'all',
      reuseExistingChunk: true,
    },
  }
  // ...
]
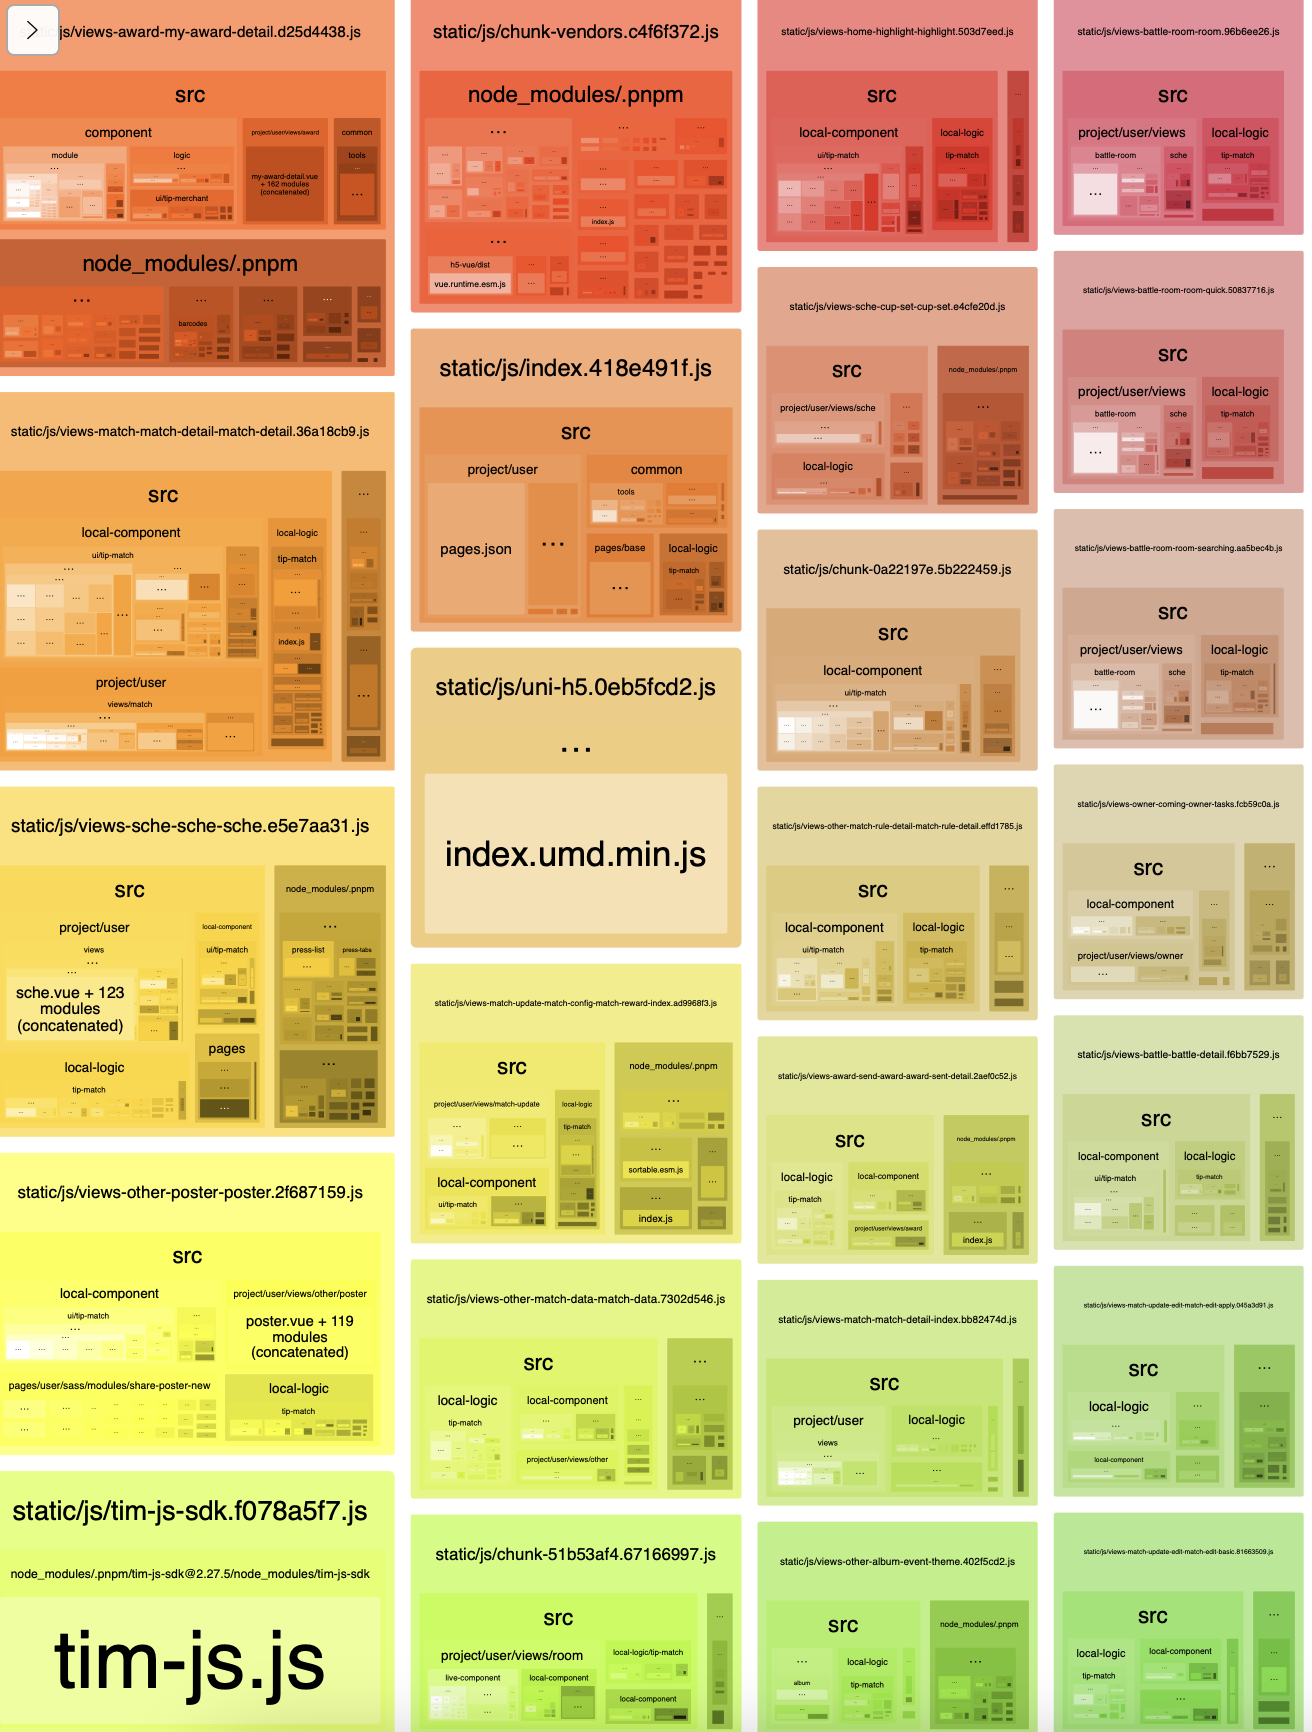
此外 tim-wx-sdk 也被打包了进来,具体看下图:
看了一下,应该是某些地方没用条件编译,且 tree-shaking 没有生效。这里我封装了下,统一用 press-ui 的:
import { TIM } from '@tencent/press-ui/common/im/helper/tim';
同时,press-ui 里的 TIM 兼容文件不能用 typescript,否则 import 部分的条件编译不生效。这里用了 javascript + ts-check 的方式,既让条件编译生效,又可以拥有类型提示。
// @ts-check
/**
 * @typedef {import("tim-js-sdk").default} TIM_TYPE
 */


// #ifdef H5
import TIM_WEB from 'tim-js-sdk';
// #endif
// #ifndef H5
import TIM_MP from 'tim-wx-sdk';
// #endif
/**
 * @type {TIM_TYPE}
 */
let TIM;

// #ifdef H5
TIM = TIM_WEB;
// #endif

// #ifndef H5
TIM = TIM_MP;
// #endif

export {
  TIM,
};
最终效果如下图:
# 3. 小程序方向
# 3.1. uni-simple-router 减包
uni-simple-router 是 uni-app 下路由三方库,可以像 vue-router 一样进行路由跳转、路由守卫等。
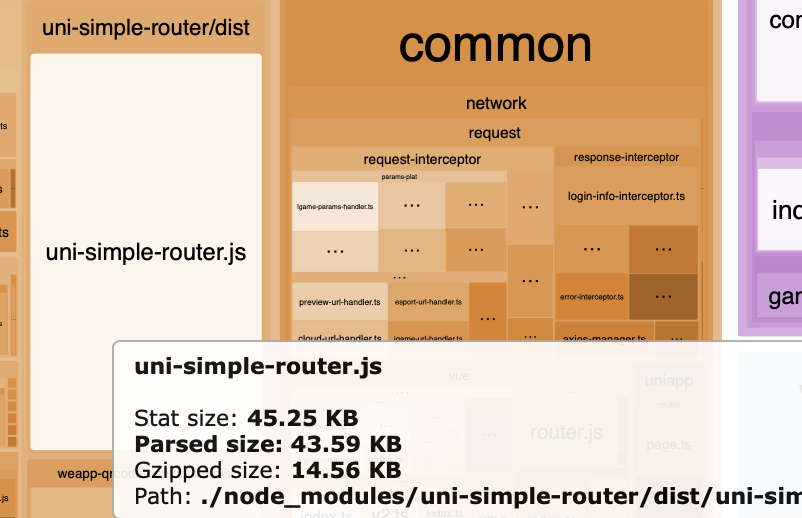
通过打包产物分析发现,这个库有 43K 这么大,小程序下"寸k存金",考虑如何减小它的体积。
查看源码发现了几个优化点:
- 打包了一份
path-to-regexp,这个可以通过externals排除,因为业务库本身也会引入 - 多平台代码共存,非小程序下的代码也会打包进来
对于第一点,解决方法已经给出了,配置 externals:
module.exports = {
  externals: {
    '@tencent/t-comm/lib/router/path-to-regexp': 'commonjs @tencent/t-comm/lib/router/path-to-regexp'
  },
}
对于第二点,可以利用条件编译。对于非小程序会用到的代码,直接用条件编译包裹起来,打包时去掉。还好我之前已经封装了一个 loader,拿来用即可。
const { LOADER_MAP } = require('@tencent/plugin-light/lib/loader');


module.export = {
  module: {
    rules: [
      {
        test: /\.tsx?$/,
        use: [
          {
            loader: 'ts-loader',
          },
          {
            loader: LOADER_MAP.ifdef,
            options: {
              context: {
                'MP-WEIXIN': true,
                MP: true,
               },
              type: ['css', 'js', 'html'],
            }
          }
        ],
        exclude: /node_modules/,
      },
    ],
  },
}
没用到的代码用条件编译包裹,示例如下:
// #ifndef MP
if (router.options.platform === 'h5') {
    proxyH5Mount(router);
    addKeepAliveInclude(router);
}
// #endif
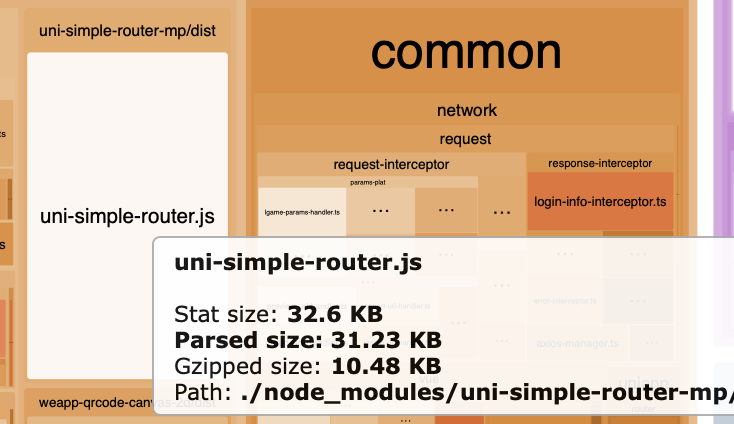
通过这几步的减包,效果如下,减少了 12K+。
使用后:
# 3.2. mini-css-extract
uni-app 小程序打包产物的 runtime 很大,而且每次做个新需求都会变大一点,这是为什么呢?
通过查看 runtime 打包产物,可以看到有很多组件路径在里面,这是 mini-css-extract-plugin 为异步 css 加载增加的运行时代码。大致结构如下:
__webpack_require__.e = function requireEnsure(chunkId) {
  var promises = [];
  // mini-css-extract-plugin CSS loading

  // cssChunks 很多,这里只列了一个
  var cssChunks = {"components/dialogs/match-intro-layer/index":1,};
  if(installedCssChunks[chunkId]) promises.push(installedCssChunks[chunkId]);
  else if(installedCssChunks[chunkId] !== 0 && cssChunks[chunkId]) {
    promises.push(installedCssChunks[chunkId] = new Promise(function(resolve, reject) {

      // 下面的对象同样很多,这里也只列了一小部分
      var href = "" + ({"component/ui/tip-merchant/tip-comp-dialog-explain/index":"component/ui/tip-merchant/tip-comp-dialog-explain/index","components/dialogs/match-intro-layer/index":"components/dialogs/match-intro-layer/index","components/global-component/global-component":"components/global-component/global-component","views/index/common/vendor":"views/index/common/vendor","node-modules/@tencent/press-ui/press-loading/press-loading":"node-modules/@tencent/press-ui/press-loading/press-loading"}[chunkId]||chunkId) + ".wxss";
      var fullhref = __webpack_require__.p + href;
      var existingLinkTags = document.getElementsByTagName("link");
      for(var i = 0; i < existingLinkTags.length; i++) {
        var tag = existingLinkTags[i];
        var dataHref = tag.getAttribute("data-href") || tag.getAttribute("href");
        if(tag.rel === "stylesheet" && (dataHref === href || dataHref === fullhref)) return resolve();
      }
      var existingStyleTags = document.getElementsByTagName("style");
      for(var i = 0; i < existingStyleTags.length; i++) {
        var tag = existingStyleTags[i];
        var dataHref = tag.getAttribute("data-href");
        if(dataHref === href || dataHref === fullhref) return resolve();
      }
      var linkTag = document.createElement("link");
      linkTag.rel = "stylesheet";
      linkTag.type = "text/css";
      linkTag.onload = resolve;
      linkTag.onerror = function(event) {
        var request = event && event.target && event.target.src || fullhref;
        var err = new Error("Loading CSS chunk " + chunkId + " failed.\n(" + request + ")");
        err.code = "CSS_CHUNK_LOAD_FAILED";
        err.request = request;
        delete installedCssChunks[chunkId]
        linkTag.parentNode.removeChild(linkTag)
        reject(err);
      };
      linkTag.href = fullhref;

      var head = document.getElementsByTagName("head")[0];
      head.appendChild(linkTag);
    }).then(function() {
      installedCssChunks[chunkId] = 0;
    }));
  }

  // JSONP chunk loading for javascript
  // 省略其他运行时代码

  return Promise.all(promises);
};
一看里面有 document 就知道肯定不会运行到,因为小程序没有 document。
那为什么会有异步 css 呢,是 vue-cli 的 css.extract 这个属性被强制设置成了 true。而 mini-css-extract-plugin 作用是把组件的 css 分离到单独的 wxss 文件。
能不能禁用掉 mini-css-extract-plugin 呢?不可以,因为 wxss 就生成不出来了。只需要把生成的上面的异步加载 css 的代码去掉即可。
这里用了一个插件,mainTemplate 的编译中会把 mini-css-extract-plugin 当成空函数。
const {
  mainTemplate,
} = compilation;
mainTemplate.hooks.localVars.intercept({
  register: (tapInfo: any) => {
    if (tapInfo.name === 'mini-css-extract-plugin') {
      tapInfo.fn = function () {};
    }
    return tapInfo;
  },
});
mainTemplate.hooks.requireEnsure.intercept({
  register: (tapInfo: any) => {
    if (tapInfo.name === 'mini-css-extract-plugin') {
      tapInfo.fn = function () {};
    }
    return tapInfo;
  },
});
效果对比,使用前:

使用后:

# 4. 效果对比
总体来说,性能是有提升的。uni-app 的运行时包体积有点大,其实可以根据项目自身定制化,因为一般根本不会用到所有API。
2024.8.1
# 5. 更多
# 5.1. md5
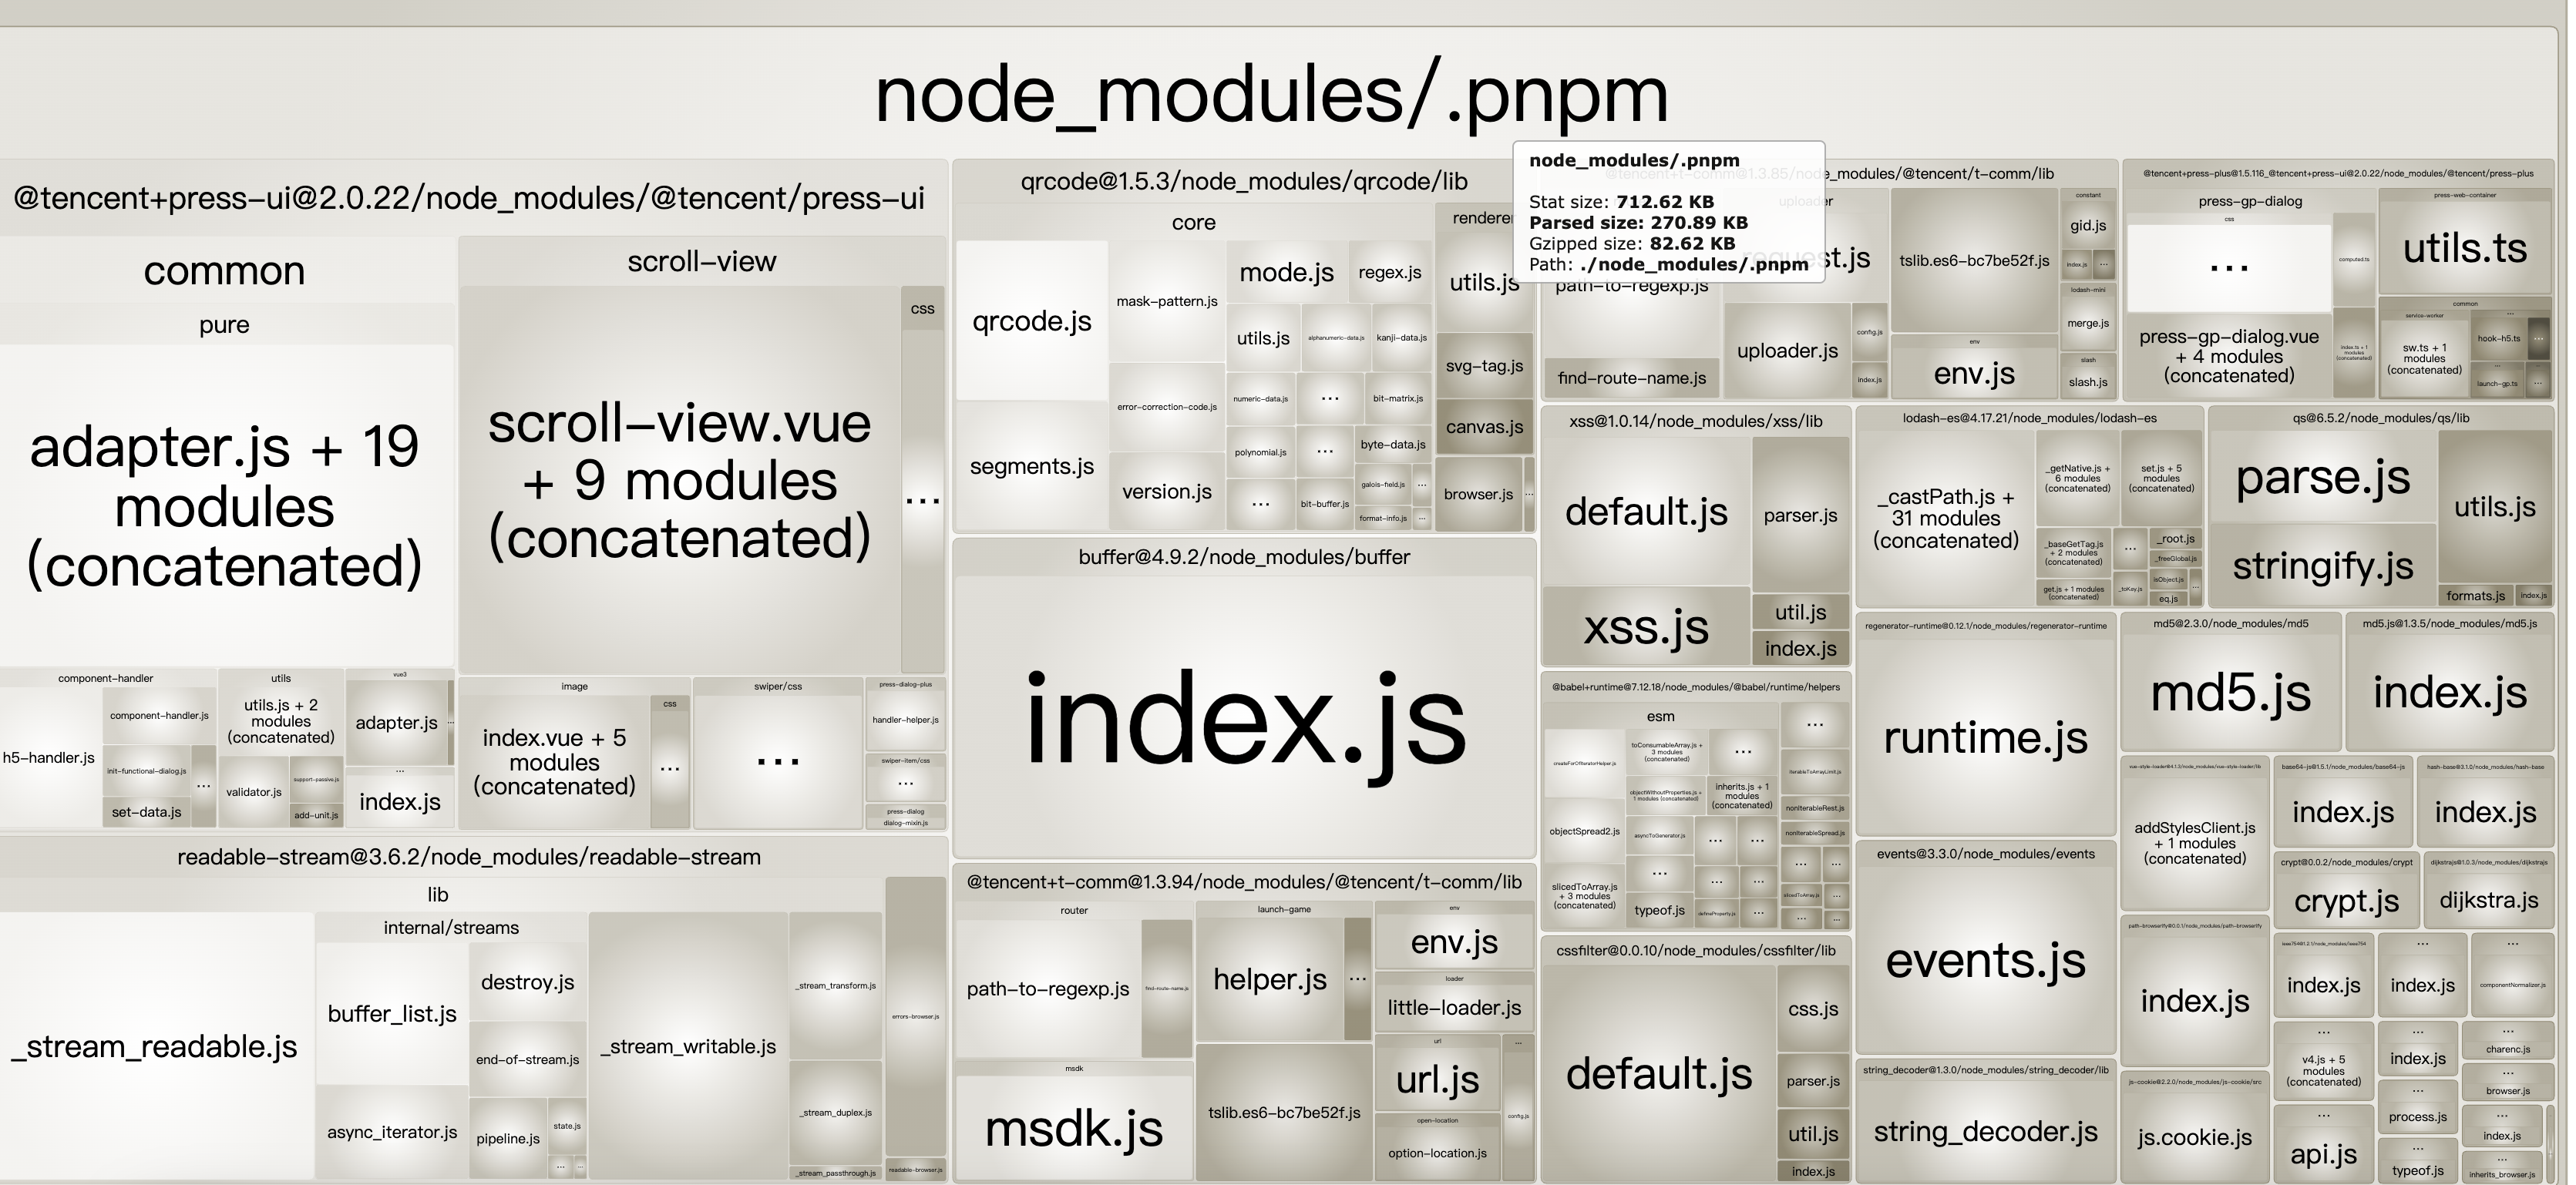
md5 的 v1 版本包体积过大,打包产物竟然有 readable-stream 等 nodejs 环境下才需要的包,改成都是用 v2.3.0,体积可以减小。
体积变化:
- 压缩前 270-198 = 72kb
- gzip后 82-62 = 20kb

# 5.2. 极简版的 uni-app H5 运行时
uni-app H5 运行时太大,内置了太多用不到的组件、API,且无法 tree-shaking,考虑用普通 Vue 环境进行编译运行。
主要原则:低成本,高效率。争取对代码零侵入,对线上零影响,对其他开发人员零感知。
改造主要分为两方面:
- 编译
- 运行
编译又包括:
- 编译命令 hook
- 条件编译
- 路由表生成
运行时包括:
- 路由
- 生命周期
- 全局变量,比如 uni,genCurrentPages
- 内置组件,比如 image
# 5.2.1. 编译
- 编译命令
package.json 中 @dcloudio/vue-cli-plugin-uni 和 @dcloudio/vue-cli-plugin-hbuilderx 被自动识别成 vue-cli-service 的插件,会被自动 require (idToPlugin 方法中),也就是自动执行。
而 @dcloudio/vue-cli-plugin-uni 是 uni-app 的插件,会检查有没有 pages.json 等,没有就退出了。所以必须在启动前将这个插件去掉。
- 条件编译
很早以前已经实现了,是跨端的灵魂,在此不再赘述。
- 路由表生成
路由需要由 pages.json 生成 routesMap,这里借用了 uni-app 内置方法,提前生成 routesMap。
# 5.2.2. 运行时
- 路由
路由改造还有运行时的工作,将 routesMap 传入,也就是使用 vue-router。
- 生命周期
实现了 onShow、onLoad、onHide 方法。
- 全局变量
封装了 uni.request 等业务中用到的方法和变量。
- 内置组件
对 image 等内置组件,进行了封装和运行时的替换。
内置组件的替换并不容易,直接设置 Vue.component('image', xxx) 会报错,需要重置 Vue 内部的保留标签,以及设置命名空间。
命名空间存在的意义是,一个文档可能包含多个软件模块的元素和属性,在不同软件模块中使用相同名称的元素或属性,可能会导致识别和冲突问题,而 xml 命名空间可以解决该问题。
重写 getTagNamespace 方法,在遇到 image 标签时,认为其不是个 svg 标签,通过 createElement 方法创建在默认命名空间下即可。
# 5.2.3. 其他
uni-app 所有的组件样式都会变成 scoped,并且它对没有显式声明 scoped 下的 scss 文件,进行了 v-deep 的替换。
改造后,这里需要注意对 App.vue 下的 scss 处理,去掉 v-deep,以及注意其他组件下的优先级问题。