一、开始
前面分析了@babel/core、@babel/parser、@babel/traverse,下面看一下@babel/generator。
这个库主要是根据AST生成代码,相对比较简单,本文会介绍其核心逻辑,再举个简单的例子。
二、API说明
看下@babel/generator官方文档,其API使用方法如下:
import { parse } from "@babel/parser";
import generate from "@babel/generator";

const code = "class Example {}";
const ast = parse(code);

const output = generate(
  ast,
  {
    /* options */
  },
  code
);
三、源码解析
本次分析的@babel/generator版本是v7.16.0。
1. 结构
@babel/generator的目录结构如下:
- generators // 对不同种类的node有不同的生成模式
- base.js
- class.js
- expression.js
...
- node // 主要是对空格和小括号的判断
- index.js
- parentheses.js
- whitespace.js
- buffer.js // Buffer类,存储最后的返回信息,包含操作_buf的方法
- printer.js // Printer类,中间层,包含print方法
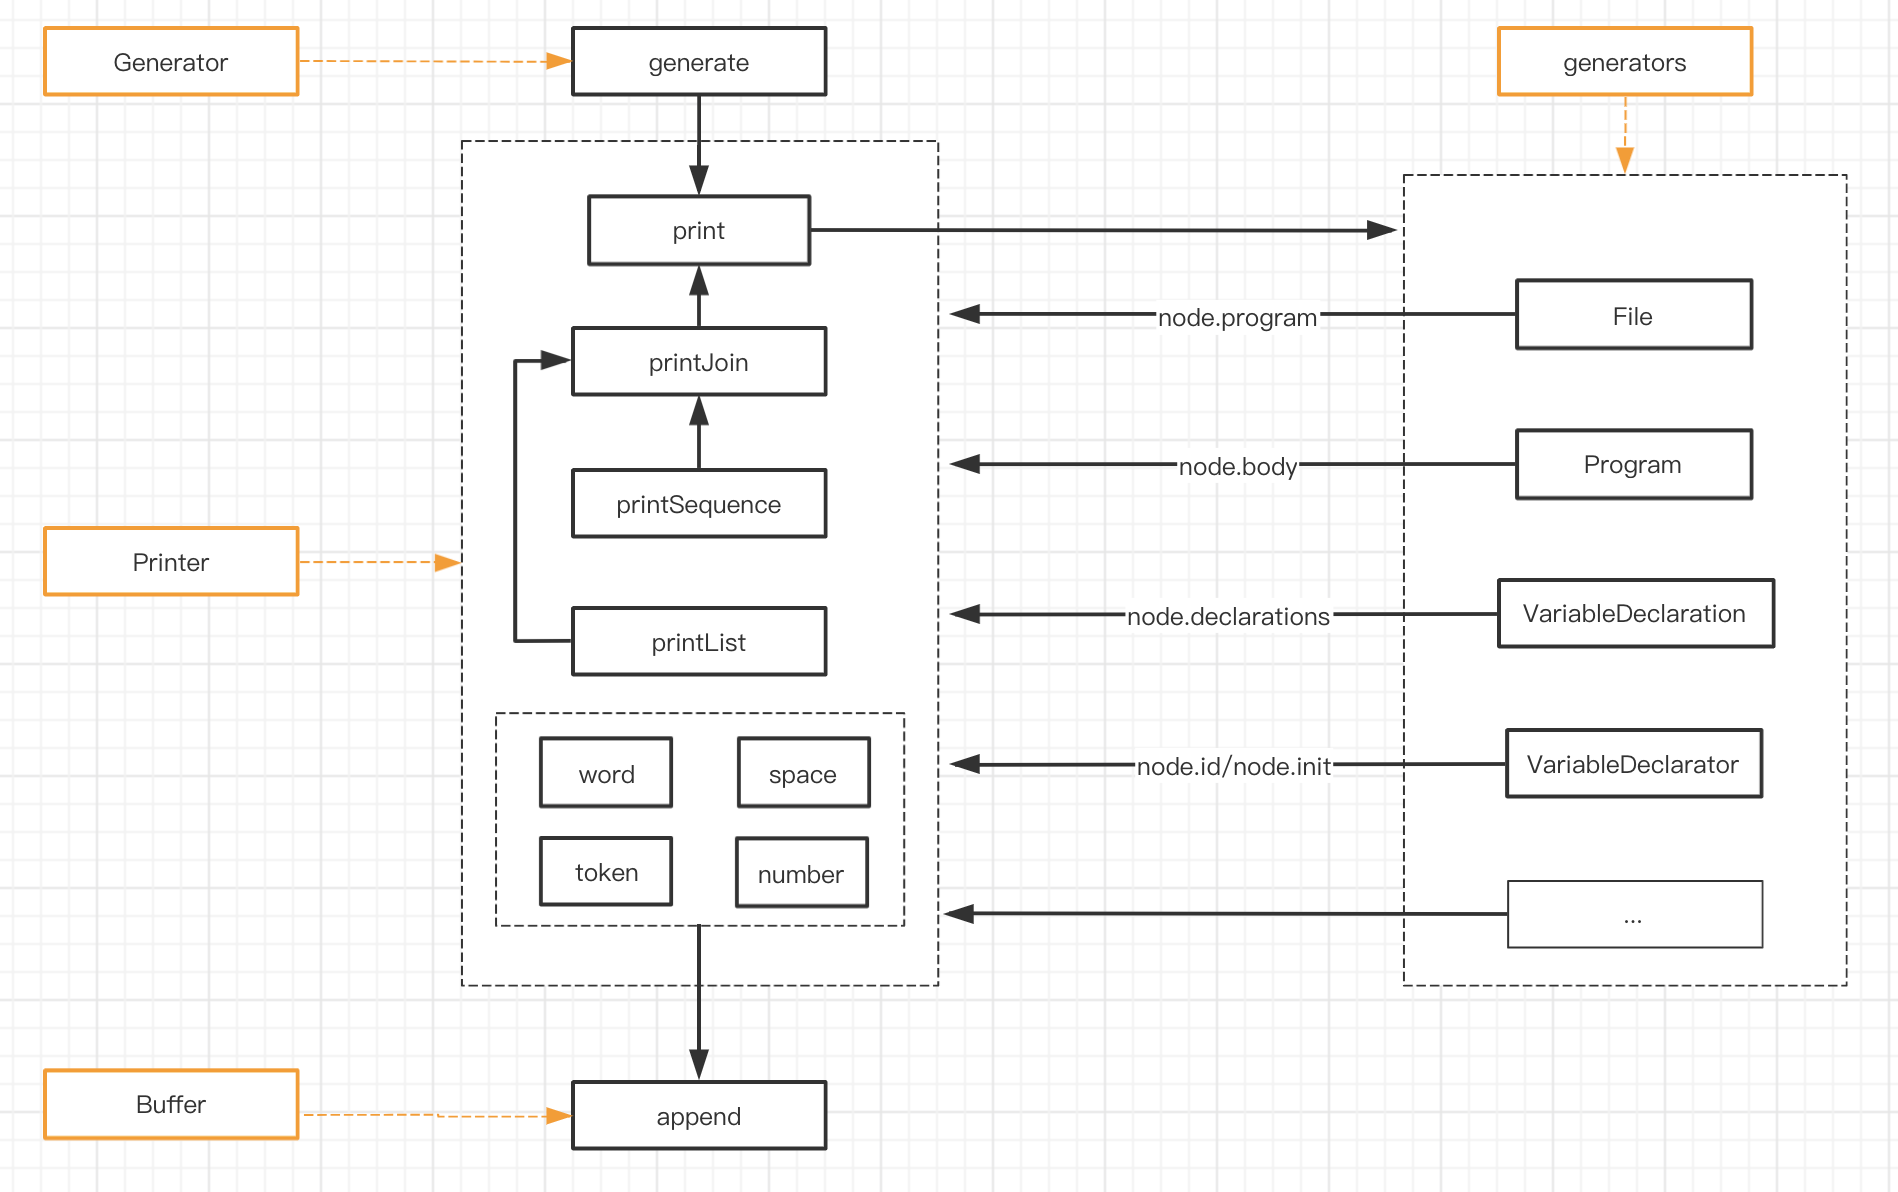
- index.js // Generator类,继承自Printer,导出generate方法2. 核心思想
@babel/generator内部维护了一个_buf,就是code字符串。遍历AST,根据Node节点的类型不同去增加或改变这个_buf,最后将其返回。
3. 运行机制
下面是一个简单的例子:
const { parse } = require("@babel/parser");
const generate = require("@babel/generator").default;

const a = "const a = 1;";
const ast = parse(a);
const code = generate(ast)

console.log('code', code)通过@babel/parser拿到AST,然后调用@babel/generator的generate方法。
这个AST在上篇关于@babel/parser文章中介绍过,主要由File、Program、VariableDeclarator、VariableDeclarator、NumericLiteral几种Node构成。
{
  "type": "File",
  "start": 0,
  "end": 11,
  "program": {
    "type": "Program",
    "start": 0,
    "end": 11,
    "sourceType": "module",
    "interpreter": null,
    "body": [
      {
        "type": "VariableDeclaration",
        "start": 0,
        "end": 11,
        "declarations": [
          {
            "type": "VariableDeclarator",
            "start": 6,
            "end": 11,
            "id": {
              "type": "Identifier",
              "start": 6,
              "end": 7,
              "name": "a"
            },
            "init": {
              "type": "NumericLiteral",
              "start": 10,
              "end": 11,
              "extra": {
                "rawValue": 1,
                "raw": "1"
              },
              "value": 1
            }
          }
        ],
        "kind": "const"
      }
    ],
  },
}调用generate后,先实例化一个Generator,然后调用其上的generate方法。它又调用了super.generate方法,也就是Printer类中定义的generate。
export default function generate(
  ast: t.Node,
  opts?: GeneratorOptions,
  code?: string | { [filename: string]: string },
): any {
  const gen = new Generator(ast, opts, code);
  return gen.generate();
}


class Generator extends Printer {
  generate() {
    return super.generate(this.ast);
  }
}

class Printer {
  generate(ast) {
    this.print(ast);
    this._maybeAddAuxComment();

    return this._buf.get();
  }
}之后进入print方法,主要是根据node.type获取printMethod,这里的node.type是File,即这里的printMethod是一个名为File的函数。
class Printer {
  print(node, parent?) {
    if (!node) return;

    const oldConcise = this.format.concise;
    if (node._compact) {
      this.format.concise = true;
    }

    const printMethod = this[node.type];
    // ...

    const loc = isProgram(node) || isFile(node) ? null : node.loc;
    this.withSource("start", loc, () => {
      printMethod.call(this, node, parent);
    });
    // ...
  }
}这个File函数来自于generators目录,就是针对node的不同类型做的不同操作。
import * as generatorFunctions from "./generators";

Object.assign(Printer.prototype, generatorFunctions);接着调用this.withSource,在它的回调中调用了printMethod。withSource方法主要是对sourcemap生成的处理,如果不需生成sourcemap,直接调用cb,这里是File函数。
class Printer {
    withSource(prop: string, loc: any, cb: () => void): void {
    this._catchUp(prop, loc);

    this._buf.withSource(prop, loc, cb);
  }
}


class Buffer {
  withSource(prop: string, loc: t.SourceLocation, cb: () => void): void {
  if (!this._map) return cb();
  // ...
  }
}File函数判断有无node.program,有的话,执行this.print(node.program.interpreter, node),也就又回到print方法中。我们的例子中有node.program,但是node.program.interpreter为null,所以再次进入print方法时什么也没做,直接返回。
接着执行this.print(node.program, node),这次进入print方法主要是执行Program方法。
export function File(this: Printer, node: t.File) {
  if (node.program) {
    this.print(node.program.interpreter, node);
  }

  this.print(node.program, node);
}

export function Program(this: Printer, node: t.Program) {
  this.printInnerComments(node, false);

  this.printSequence(node.directives, node);
  if (node.directives && node.directives.length) this.newline();

  this.printSequence(node.body, node);
}这次node上没有directives属性,所以会调用this.printSequence(node.body, node)。之所以不用print方法,是因为node.body是数组类型。
printSequence中调用了printJoin方法,printJoin中依次遍历传入的nodes,调用_printNewline和this.print方法。
再次进入print中,会调用VariableDeclaration方法。
class Printer {
  printSequence(
    nodes,
    parent,
    opts: {
      statement?: boolean;
      indent?: boolean;
      addNewlines?: Function;
    } = {},
  ) {
    opts.statement = true;
    return this.printJoin(nodes, parent, opts);
  }

  printJoin(nodes: Array<any> | undefined | null, parent: any, opts: any = {}) {
    if (!nodes?.length) return;

    if (opts.indent) this.indent();

    const newlineOpts = {
      addNewlines: opts.addNewlines,
    };

    for (let i = 0; i < nodes.length; i++) {
      const node = nodes[i];
      if (!node) continue;

      if (opts.statement) this._printNewline(true, node, parent, newlineOpts);

      this.print(node, parent);

      if (opts.iterator) {
        opts.iterator(node, i);
      }

      if (opts.separator && i < nodes.length - 1) {
        opts.separator.call(this);
      }

      if (opts.statement) this._printNewline(false, node, parent, newlineOpts);
    }

    if (opts.indent) this.dedent();
  }
}VariableDeclaration方法在generators/statement.js中,会先调用this.word(node.kind),word方法会调用Buffer中的_append方法。也就是在_buf中添加一个字符——node.kind,这里就是const。
然后调用this.space()添加一个空格。
接着调用this.printList(node.declarations, node, { separator }。
export function VariableDeclaration(
  this: Printer,
  node: t.VariableDeclaration,
  parent: t.Node,
) {
  if (node.declare) {
    this.word("declare");
    this.space();
  }

  this.word(node.kind);
  this.space();

  let hasInits = false;
  if (!isFor(parent)) {
    for (const declar of node.declarations as Array<any>) {
      if (declar.init) {
        hasInits = true;
      }
    }
  }
  let separator;
  if (hasInits) {
    separator =
      node.kind === "const"
        ? constDeclarationIndent
        : variableDeclarationIndent;
  }

  this.printList(node.declarations, node, { separator });

  if (isFor(parent)) {
    if (isForStatement(parent)) {
      if (parent.init === node) return;
    } else {
      if (parent.left === node) return;
    }
  }

  this.semicolon();
}

class Printer {
  word(str: string): void {
    if (
      this._endsWithWord ||
      (this.endsWith(charCodes.slash) && str.charCodeAt(0) === charCodes.slash)
    ) {
      this._space();
    }

    this._maybeAddAuxComment();
    this._append(str);

    this._endsWithWord = true;
  }

  _append(str: string, queue: boolean = false) {
    this._maybeAddParen(str);
    this._maybeIndent(str);

    if (queue) this._buf.queue(str);
    else this._buf.append(str);

    this._endsWithWord = false;
    this._endsWithInteger = false;
  }
}

class Buffer {
  append(str: string): void {
    this._flush();
    const { line, column, filename, identifierName, force } =
      this._sourcePosition;
    this._append(str, line, column, identifierName, filename, force);
  }

  _append(
    str: string,
    line: number,
    column: number,
    identifierName?: string | null,
    filename?: string | null,
    force?: boolean,
  ): void {
    this._buf += str;
    this._last = str.charCodeAt(str.length - 1);

    let i = str.indexOf("\n");
    let last = 0;

    if (i !== 0) {
      this._mark(line, column, identifierName, filename, force);
    }

    while (i !== -1) {
      this._position.line++;
      this._position.column = 0;
      last = i + 1;

      if (last < str.length) {
        this._mark(++line, 0, identifierName, filename, force);
      }
      i = str.indexOf("\n", last);
    }
    this._position.column += str.length - last;
  }
}printList与printSequence的区别是,printList会提供separator,也就是在拼接的时候会提供连接符,比如,,;。
这里会遍历node.declarations,调用print方法。例子中node.declarations中只有一个元素,其type为VariableDeclarator,也就是会调用VariableDeclarator方法。
class Printer {
  printList(
    items,
    parent,
    opts: { separator?: Function; indent?: boolean; statement?: boolean } = {},
  ) {
    if (opts.separator == null) {
      opts.separator = commaSeparator;
    }

    return this.printJoin(items, parent, opts);
  }
}VariableDeclarator方法主要逻辑有:
- 调用
this.print(node.id, node),这里node.id是type为Identifier的Node node.init存在的话,调用space、token方法等,这里node.init为type为NumericLiteral的Node
export function VariableDeclarator(this: Printer, node: t.VariableDeclarator) {
  this.print(node.id, node);
  if (node.definite) this.token("!"); // TS
  this.print(node.id.typeAnnotation, node);
  if (node.init) {
    this.space();
    this.token("=");
    this.space();
    this.print(node.init, node);
  }
}我们已经知道print方法主要是调用与node.type同名的函数,这里会调用Identifier函数和NumericLiteral函数,最终为_buf增加a = 1
export function Identifier(this: Printer, node: t.Identifier) {
  this.exactSource(node.loc, () => {
    this.word(node.name);
  });
}

export function NumericLiteral(this: Printer, node: t.NumericLiteral) {
  const raw = this.getPossibleRaw(node);
  const opts = this.format.jsescOption;
  const value = node.value + "";
  if (opts.numbers) {
    this.number(jsesc(node.value, opts));
  } else if (raw == null) {
    this.number(value); // normalize
  } else if (this.format.minified) {
    this.number(raw.length < value.length ? raw : value);
  } else {
    this.number(raw);
  }
}最后调用this._buf.get()将code、map等信息返回。
class Buffer {
  get(): any {
    this._flush();

    const map = this._map;
    const result = {
      code: this._buf.trimRight(),
      map: null,
      rawMappings: map?.getRawMappings(),
    };

    if (map) {
      Object.defineProperty(result, "map", {
        configurable: true,
        enumerable: true,
        get() {
          return (this.map = map.get());
        },
        set(value) {
          Object.defineProperty(this, "map", { value, writable: true });
        },
      });
    }

    return result;
  }
}
4. 流程图
四、总结
本文简单介绍了@babel/generator主要逻辑,其可视为分层架构:
Buffer层维护核心的_buf,提供操作_buf和_queue的append等方法;Printer为中间的抽象层,调用底层Buffer中提供的append等方法,并提供print、printList等方法;Generator为顶层,提供对外API。
生成code的思想就是从顶层File、Program开始,分析Node.type,递归调用对应的生成函数,不断增加或修改_buf,最后返回。
五、系列文章
- Babel基础
- Babel源码解析之@babel/core
- Babel源码解析之@babel/parser
- Babel源码解析之@babel/traverse
- Babel源码解析之@babel/generator