一、开始
Vue-CLI 是 Vue 官方脚手架。,包含初始化工程、增加插件等功能。本次分析的 Vue-CLI 版本是 v4.5.11。
二、Vue-CLI
Vue-CLI 库属于 monorepo 模式,除了 @vue/cli 这个 NPM 包之外,还有一些 plugin、vue-cli-service 等。
Vue-CLI 对外暴露的 bin 命令是 vue。全局安装 Vue-CLI后,在终端输入 Vue,会打印出 Vue-CLI 的帮助信息。
$ Vue
Usage: Vue <command> [options]

Options:
  -V, --version                              output the version number
  -h, --help                                 output usage information

Commands:
  create [options] <app-name>                create a new project powered by vue-cli-service
  add [options] <plugin> [pluginOptions]     install a plugin and invoke its generator in an already created project
  invoke [options] <plugin> [pluginOptions]  invoke the generator of a plugin in an already created project
  inspect [options] [paths...]               inspect the webpack config in a project with vue-cli-service
  serve [options] [entry]                    serve a .js or .vue file in development mode with zero config
  build [options] [entry]                    build a .js or .vue file in production mode with zero config
  ui [options]                               start and open the vue-cli ui
  init [options] <template> <app-name>       generate a project from a remote template (legacy API, requires @vue/cli-init)
  config [options] [value]                   inspect and modify the config
  outdated [options]                         (experimental) check for outdated vue cli service / plugins
  upgrade [options] [plugin-name]            (experimental) upgrade vue cli service / plugins
  migrate [options] [plugin-name]            (experimental) run migrator for an already-installed cli plugin
  info                                       print debugging information about your environment

  Run vue <command> --help for detailed usage of given command.
从上面可以看到 Vue-CLI 中可以使用的命令包括 vue create、vue add、vue invoke 等。
在源码的 packages/@vue/cli/bin/vue.js 文件可以看到所有命令。
Vue create 是 Vue-CLI 最重要的内容,下面重点看下 Vue create 的流程,以及值得我们学习的地方。
三、Vue create
Vue create 作用是创建一个 Vue 项目,该命令提供了丰富的选项,比如可选择 Babel 版本、是否使用 Typescirpt/Eslint/单元测试/e2e测试 等。
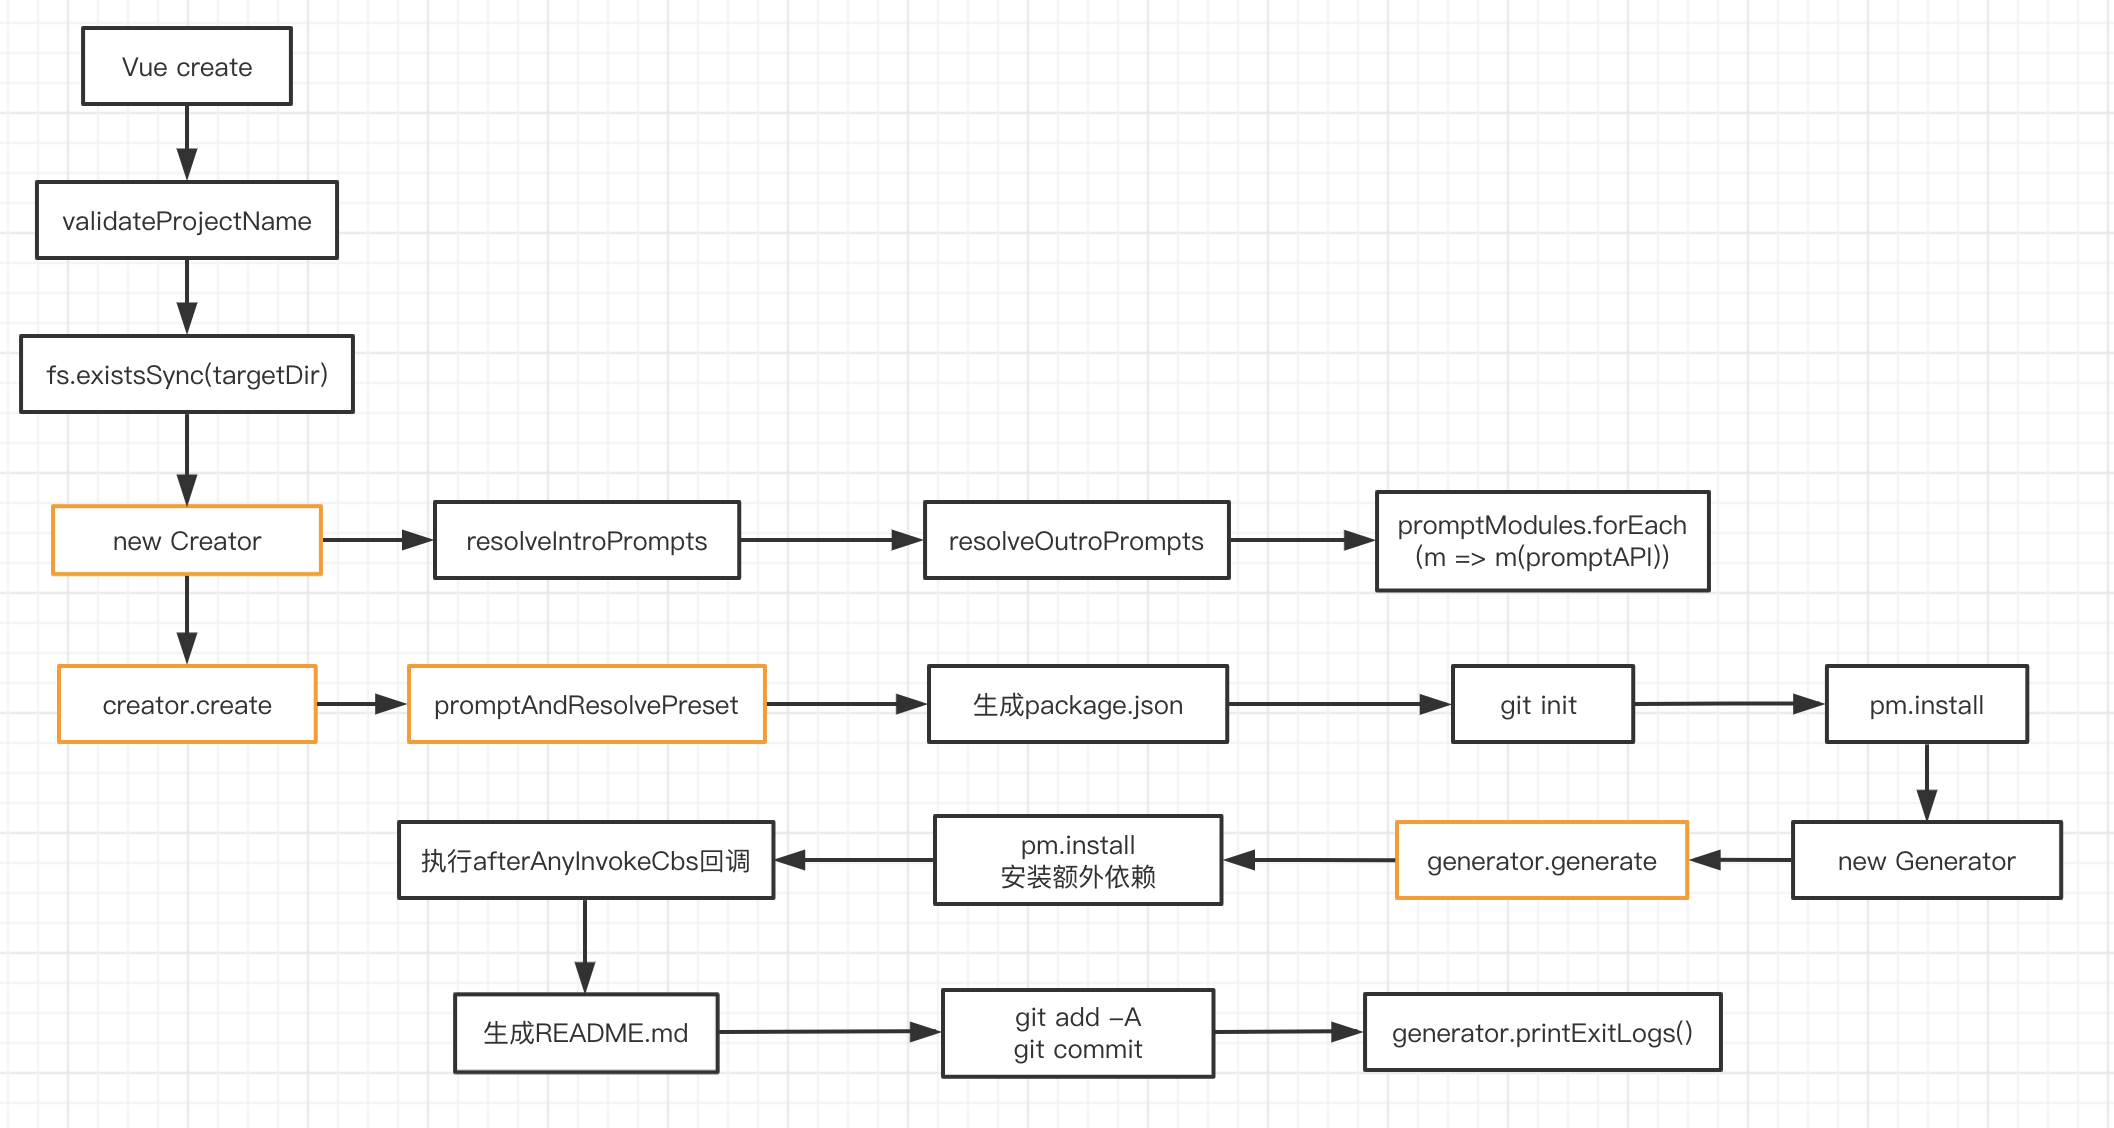
1. 总体流程
直接看图:
2. 注入 promptModules
Vue-CLI 中 prompt 的生成利用了依赖注入的思想,就是把高层次(这里是 Creator)依赖的模块(这里是 prompt)通过传参的方式注入到高层次模块内部。
// create.js
const { getPromptModules } = require('./util/createTools')

async function create (projectName, options) {
  // ...
  const creator = new Creator(name, targetDir, getPromptModules())
  await creator.create(options)
}


// Creator.js
module.exports = class Creator extends EventEmitter {
  constructor (name, context, promptModules) {
    // ...
    const promptAPI = new PromptModuleAPI(this)
    promptModules.forEach(m => m(promptAPI))
  }
}


// PromptModuleAPI.js
module.exports = class PromptModuleAPI {
  constructor (creator) {
    this.creator = creator
  }

  injectFeature (feature) {
    this.creator.featurePrompt.choices.push(feature)
  }

  injectPrompt (prompt) {
    this.creator.injectedPrompts.push(prompt)
  }

  injectOptionForPrompt (name, option) {
    this.creator.injectedPrompts.find(f => {
      return f.name === name
    }).choices.push(option)
  }

  onPromptComplete (cb) {
    this.creator.promptCompleteCbs.push(cb)
  }
}
getPromptModules 是获取了所有要注入的 prompt,不同类型的 prompt 在单独的文件中。
// util/createTools.js
exports.getPromptModules = () => {
  return [
    'vueVersion',
    'babel',
    'typescript',
    'pwa',
    'router',
    'vuex',
    'cssPreprocessors',
    'linter',
    'unit',
    'e2e'
  ].map(file => require(`../promptModules/${file}`))
}
比如 vueVersion.js 作用是选择 vue 版本:
// lib/promptModules/vueVersion.js
module.exports = cli => {
  cli.injectFeature({
    name: 'Choose Vue version',
    value: 'vueVersion',
    description: 'Choose a version of Vue.js that you want to start the project with',
    checked: true
  })

  cli.injectPrompt({
    name: 'vueVersion',
    when: answers => answers.features.includes('vueVersion'),
    message: 'Choose a version of Vue.js that you want to start the project with',
    type: 'list',
    choices: [
      {
        name: '2.x',
        value: '2'
      },
      {
        name: '3.x (Preview)',
        value: '3'
      }
    ],
    default: '2'
  })

  cli.onPromptComplete((answers, options) => {
    if (answers.vueVersion) {
      options.vueVersion = answers.vueVersion
    }
  })
}
promptModules 为 cli 注入 featurePrompt、injectedPrompts,featurePrompt 是外层的 feature,比如Bable、Typescript、Router、Vuex 这些选项,injectedPrompts 是选择了某个 feature 后,再次弹出的选择,比如选择 Vue 版本。
featurePrompt 举例:
$ vue create test-vue-cli
Vue CLI v4.5.11

? Please pick a preset: Manually select features
? Check the features needed for your project: (Press <space> to select, <a> to toggle all, <i> to invert selection)
❯◉ Choose Vue version
 ◉ Babel
 ◯ TypeScript
 ◯ Progressive Web App (PWA) Support
 ◯ Router
 ◯ Vuex
 ◯ CSS Pre-processors
 ◉ Linter / Formatter
 ◯ Unit Testing
 ◯ E2E Testing
injectedPrompts 举例:
? Please pick a preset: Manually select features
? Check the features needed for your project: Choose Vue version, Babel, Linter
? Choose a version of Vue.js that you want to start the project with (Use arrow keys)
❯ 2.x
  3.x (Preview)
3. 插件系统
Vue-CLI 3 是基于插件的,插件可以:
- 修改项目的
webpack配置 - 添加新的
vue-cli-service命令 - 扩展
package.json - 在项目中创建新文件、或者修改老文件
- 提示用户选择一个特定的选项
插件的实现原理是,每个插件提供一个函数,接受 api、options、root options 三个参数,api 参数由 Vue-CLI 提供,在 GeneratorAPI.js 中,主要有下面几种:
hasPlugin:判断项目中是否有某个插件extendPackage:拓展package.json配置render:利用ejs渲染模板文件onCreateComplete:内存中保存的文件字符串全部被写入文件后的回调函数exitLog:当generator退出的时候输出的信息genJSConfig:将json文件生成为js配置文件injectImports:向文件当中注入import语法的方法injectRootOptions:向 Vue 根实例中添加选项
插件执行的时机是在 generator.generate() 中,可对照着上面的总流程图看。
// Generator.js
module.exports = class Generator {
  async generate ({
    extractConfigFiles = false,
    checkExisting = false
  } = {}) {
    await this.initPlugins()
    // ...
  }

  async initPlugins () {
    const { rootOptions, invoking } = this
    const pluginIds = this.plugins.map(p => p.id)

    // apply hooks from all plugins
    for (const id of this.allPluginIds) {
      const api = new GeneratorAPI(id, this, {}, rootOptions)
      const pluginGenerator = loadModule(`${id}/generator`, this.context)

      if (pluginGenerator && pluginGenerator.hooks) {
        await pluginGenerator.hooks(api, {}, rootOptions, pluginIds)
      }
    }

    // ...

    // apply generators from plugins
    for (const plugin of this.plugins) {
      const { id, apply, options } = plugin
      const api = new GeneratorAPI(id, this, options, rootOptions)
      await apply(api, options, rootOptions, invoking)

      if (apply.hooks) {
        // while we execute the entire `hooks` function,
        // only the `afterInvoke` hook is respected
        // because `afterAnyHooks` is already determined by the `allPluginIds` loop above
        await apply.hooks(api, options, rootOptions, pluginIds)
      }

      // restore "any" hooks
      this.afterAnyInvokeCbs = afterAnyInvokeCbsFromPlugins
    }

  }
}
4. preset
Vue-CLI 中的 preset 可以用来管理插件及其他配置,当用户 Vue create 创建项目时保存了自己的选项,就可以通过 vue config 命令查看此 preset,其保存在 ~/.vuerc 文件中。
preset 举例:
{
  "useConfigFiles": true,
  "cssPreprocessor": "sass",
  "plugins": {
    "@vue/cli-plugin-babel": {},
    "@vue/cli-plugin-eslint": {
      "config": "airbnb",
      "lintOn": ["save", "commit"]
    },
    "@vue/cli-plugin-router": {},
    "@vue/cli-plugin-vuex": {}
  }
}
preset 在源码的作用是也是管理插件,也就是插件是从 preset 的配置上取的。
// Creator.js
module.exports = class Creator extends EventEmitter {

  async create (cliOptions = {}, preset = null) {
    // ...
    preset = await this.promptAndResolvePreset()

    preset = cloneDeep(preset)
    // inject core service
    preset.plugins['@vue/cli-service'] = Object.assign({
      projectName: name
    }, preset)

    if (cliOptions.bare) {
      preset.plugins['@vue/cli-service'].bare = true
    }

    // legacy support for router
    if (preset.router) {
      preset.plugins['@vue/cli-plugin-router'] = {}

      if (preset.routerHistoryMode) {
        preset.plugins['@vue/cli-plugin-router'].historyMode = true
      }
    }

    const plugins = await this.resolvePlugins(preset.plugins, pkg)
    const generator = new Generator(context, {
      pkg,
      plugins,
      afterInvokeCbs,
      afterAnyInvokeCbs
    })
    // ...
  }
}
四、其他命令
Vue add,安装插件并调用。安装插件其实就是执行了npm install/yarn install,调用插件就是实例化一个 Genarator,然后调用generator.generate()方法,和Vue create的一部分流程类似。Vue invoke,调用插件。和Vue add不同的是没有安装插件的部分Vue inspect,审查一个Vue Cli项目的webpack配置。内部会调用vue-cli-service中的inspect方法,config可以通过api.resolveWebpackConfig()拿到,然后将其保存成文件即可。
五、create-react-app
Vue-CLI 和 create-react-app 很像,下面是使用 create-react-app 初始化一个 React 项目的流程图:
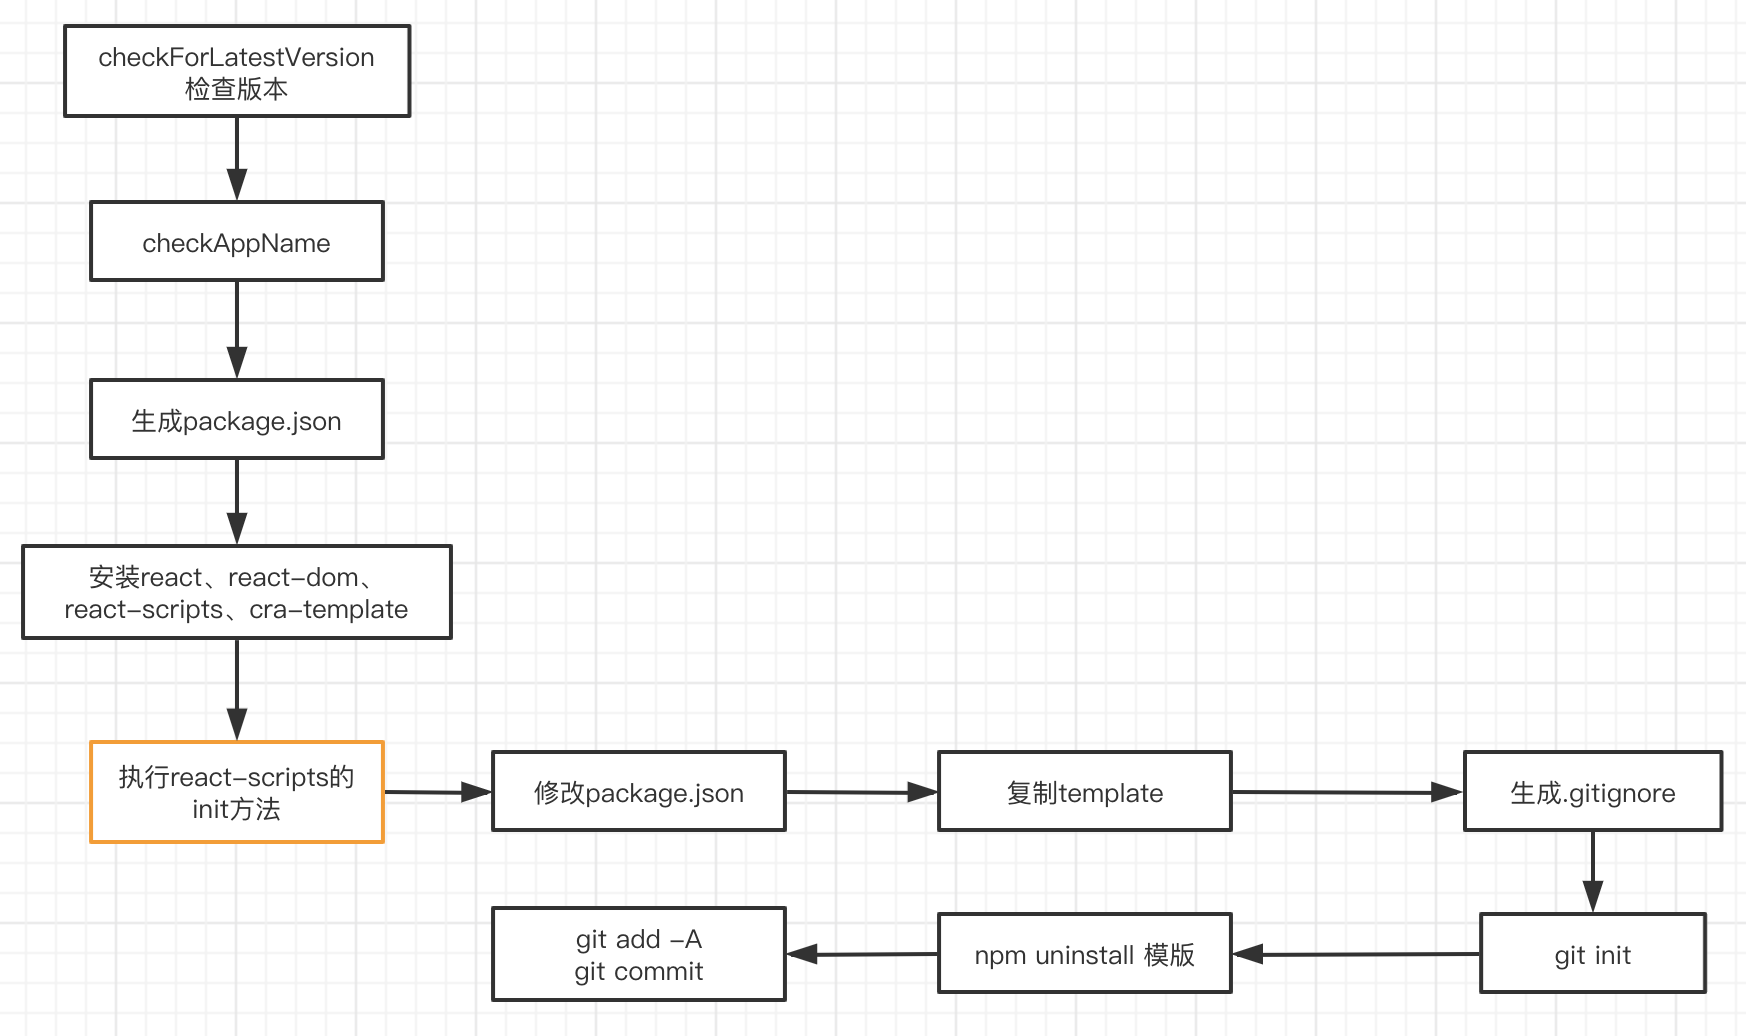
create-react-app 生成的项目可以通过 react-scripts 执行 start/build 命令,react-scripts 就相当于vue-cli-service。
Vue CLI 的模版文件是通过 vue-cli-service 注入的,而 create-react-app 的模版是直接复制的 cra-teamplate。